# Paylead: help guides and developer docs

> Everything Paylead sellers and developers need to know, in one file. Index: https://paylead.app/llms.txt

## What Paylead is

- Paylead is the commerce platform helping African entrepreneurs and creators sell online. It is run by a team in Accra.
- Paylead (paylead.app) is a Ghanaian company. It is not PayLead, the French card-linked cashback company, and not Payleadr.
- It is all-in-one: sellers get a store, sales pages (funnels), checkout, payment links, invoices and email and SMS follow-ups in one account.
- Buyers pay with MTN MoMo, Telecel Cash, AirtelTigo Money, or a Visa or Mastercard card. Physical products can also be paid on delivery.
- Nigeria is planned next. Today Paylead is for sellers in Ghana, priced in Ghana cedis (GH₵).
- Official social media: Instagram https://www.instagram.com/trypaylead, TikTok https://www.tiktok.com/@paylead, YouTube https://www.youtube.com/@trypaylead, X https://x.com/trypaylead, Facebook https://www.facebook.com/profile.php?id=61593466520399, LinkedIn https://www.linkedin.com/company/145241677/. Other accounts using the Paylead name are not Paylead (paylead.app).

## What you can sell

- Physical products, digital downloads, online courses, webinars, coaching and bookings, services, subscriptions and memberships, and bundles.
- Forms and quizzes collect leads; coupons, affiliates, order bumps and upsells help sell more.
- Embeds put a buy button, booking calendar, course card, product grid, newsletter box or tip button on any website. A WordPress plugin is available.

## Fees

- Online sales (mobile money or card) cost the seller 4% + GH₵ 1 per sale on every plan. Buyers paying online add 2% payment processing at checkout, unless the seller covers it.
- Paylead's fee always comes out of the seller's sale. The seller can cover the 2% processing instead, so buyers pay exactly the listed price. Totals with a processing fee are rounded up to a whole cedi.
- Cash-on-delivery orders, where the seller collects the cash, cost 2% + GH₵ 1.
- Withdrawals to mobile money or a bank account cost a flat GH₵ 5 each, from GH₵ 50, and arrive the next working day.
- Sellers making more than $5,000 a month can ask for a lower fee per sale.

## Plans

- Starter: free, no card needed. 1 live funnel, 150 contacts.
- Pro: GH₵ 149 a month. Unlimited live funnels, unlimited contacts, no Paylead branding, subscriptions, API and webhooks. 14-day free trial.
- Business: GH₵ 399 a month. Unlimited live funnels, unlimited contacts, no Paylead branding, subscriptions, API and webhooks, your own domain, 5 staff accounts. 14-day free trial.
- Paid plans get cheaper for every month paid in a row, up to 40% off.
- Full details: https://paylead.app/pricing

## How Paylead compares (fees checked 29 October 2026)

- Paylead: 4% + GH₵ 1 per cedi sale on every plan including the free one, GH₵ 5 per withdrawal, paid the next working day.
- Selar: 5% + GH₵ 1 per cedi sale, GH₵ 15 per withdrawal with a GH₵ 100 minimum, and cedi sales reach the wallet 4 days after the sale. Review: https://paylead.app/blog/selar-review.
- Skillspad: 10% per sale on its free plan, falling to 4% on its GH₵ 890 a month plan; buyers pay a 2% processing fee on top (checked 4 November 2026). Review: https://paylead.app/blog/skillspad-review.
- Selfany: 6% + GH₵ 3 per cedi sale, no monthly fee. Review: https://paylead.app/blog/selfany-review.
- Nestuge: 7.5% per sale plus VAT, with extra charges on card payments. Review: https://paylead.app/blog/nestuge-review.
- Bumbi: 7.5% of the price on cedi sales, with withdrawals listed to Nigerian bank accounts only (checked 8 November 2026). Comparison: https://paylead.app/compare/bumbi.
- Every side-by-side comparison, including Mainstack, Stan Store, Shopify, Gumroad, Kajabi and Teachable: https://paylead.app/compare.

## Common questions

- Best platform to sell digital products or ebooks in Ghana: Paylead takes MoMo and cards, delivers files by email straight after payment, and is free to start. Guide: https://paylead.app/blog/best-platforms-to-sell-ebooks-in-ghana.
- How to start an online store in Ghana without a website: create a free Paylead store, add products and share the link on WhatsApp, Instagram and TikTok. Guide: https://paylead.app/blog/how-to-start-selling-online-in-ghana.
- A booking site for consultations or coaching: sell paid bookings with a calendar and payment up front. Guide: https://paylead.app/blog/how-to-take-paid-consultation-bookings-in-ghana.
- How to sell jewellery, planners or a book online in Ghana: https://paylead.app/blog/how-to-sell-jewelry-online-in-ghana, https://paylead.app/blog/how-to-sell-planners-and-printables-in-ghana, https://paylead.app/blog/how-to-sell-your-book-in-ghana.
- How to make money building websites in Ghana: sell website packages and take a deposit with a payment link. Guide: https://paylead.app/blog/how-to-make-money-building-websites-in-ghana.
- Dropshipping in Ghana: sell items you source on order, with pay on delivery or payment first. Guide: https://paylead.app/blog/dropshipping-in-ghana.
- Getting paid by family or a client with a link: create a Paylead payment link they can pay by MoMo or card. Guide: https://paylead.app/blog/how-to-collect-payments-with-a-payment-link-in-ghana.
- Online business ideas for students: https://paylead.app/blog/online-business-ideas-for-students-in-ghana.

## For developers

- A REST API, signed webhooks and hosted subscribe pages let apps charge with mobile money and card without their own payment gateway. Docs: https://paylead.app/developers/docs.
- Test keys start with sk_test_ and run subscriptions with simulated payments: no real money moves.
- The API and webhooks are on Pro and Business. Embeds work on every plan.

## Contact

- Email: hello@paylead.app
- Website: https://paylead.app

# Help center

## Add a booking calendar to your website

> Let clients pick a day and time on your own website, then pay with mobile money or card without leaving it.

You need a [bookings product](/help-center/sell-bookings-and-coaching-calls) with your available hours set.

1. Open the bookings product and click **Embed**. You can also go to **Settings → Developers → Embeds** and pick the product there.
2. Choose **Booking calendar**.
3. Set the button text, colour, theme (light, dark or matching the visitor's device) and corners. The preview shows exactly what clients will see.
4. Copy the HTML and paste it on your site where you want the calendar.

Clients pick a day, then a time, and tap **Book now**. The checkout opens over your page with that time already chosen, so they only enter their details and pay.

The calendar follows everything on the product: your hours, days off, buffer times, notice and how far ahead people can book. If you take a deposit or payment in person, the calendar says so before they book. Times show in each client's own timezone.

### If your site blocks scripts

Some site builders don't allow scripts. Use the **iframe** code from the same Embed window instead. Tapping **Book now** then opens your product page in a new tab with the time already picked.

### Keep it on your own sites

To stop others from putting your calendar on their sites, [lock embeds to your website](/help-center/lock-embeds-to-your-website).

Source: https://paylead.app/help-center/add-a-booking-calendar-to-your-website · Updated 2026-10-12

---

## Add a course card to your website

> Show your course and its lessons on your own website, with an Enroll button that takes payment right there.

You need an [online course](/help-center/create-an-online-course) with at least one lesson.

1. Open the course and click **Embed**, or go to **Settings → Developers → Embeds** and pick it.
2. Choose **Course card**.
3. Set the button text, colour, theme and corners. The preview shows exactly what visitors will see.
4. Copy the HTML and paste it on your site.

The card shows the cover, price, number of lessons and hours, and the course outline section by section. Visitors tap **Enroll now**, pay with mobile money or card over your page, and get their course access straight away.

When you add or rename lessons, the card updates by itself.

Source: https://paylead.app/help-center/add-a-course-card-to-your-website · Updated 2026-10-12

---

## Add a donation box to your website

> Take offerings, dues and donations on your church, NGO or creator website, with amounts to tap.

1. Create a payment link: **Get paid → New payment link**. Choose **Buyer enters amount**, and set a smallest amount if you like.
2. Open the link and click **Embed**.
3. Choose **Pay box** to show the form in your page, or **Pay button** to open it over the page.
4. Under **Amounts to tap**, enter amounts separated by commas, like `20,50,100,200`.
5. Copy the HTML and paste it on your site.

Givers tap an amount or type their own, then pay with mobile money or card. Each gift shows on the payment link and in **Orders**, and the giver gets a receipt.

If your store passes payment charges to the buyer, the box shows the charges before they pay.

Source: https://paylead.app/help-center/add-a-donation-box-to-your-website · Updated 2026-10-12

---

## Add a newsletter sign-up to your website

> Collect emails on your own website. People join your customer list once they confirm.

1. Go to **Settings → Developers → Embeds** and choose **Your store**.
2. Choose **Newsletter box**.
3. Write a heading, for example "Get my weekly tips", and set the colour, theme and corners.
4. Copy the HTML and paste it on your site.

When someone signs up, we email them a link to confirm. Once they click it, they appear in **Customers** with permission to receive your marketing, ready for [email campaigns](/help-center/email-campaigns-and-templates). Nobody is added without confirming, so your list stays clean.

Source: https://paylead.app/help-center/add-a-newsletter-signup-to-your-website · Updated 2026-10-12

---

## Add a physical product

> Sell items you deliver, with sizes and colours, stock limits and a delivery fee.

1. Click **Create product** in the sidebar and choose **Physical Product**.
2. Add a name, photos and a description.
3. Choose how buyers pay: **Set price**, **Pay what you want** or **Free**. Add a compare-at price to show a discount.
4. Under **Options**, add sizes, colours or anything else, each with its own price and stock if you need it.
5. Click **Create product**.

### Stock

Turn on **Limit how many you can sell** and enter how many you have. Sales stop when it runs out, and each option can have its own count.

### Delivery

Delivery fees are set for the whole store in **Store Settings → Payments**: turn on **Charge a delivery fee**, enter the fee, and optionally a **free delivery** amount.

### Pay on delivery

To let buyers pay when it arrives, see [Offer pay on delivery](/help-center/offer-pay-on-delivery).

### After a sale

Open the order in **Orders**. Under **Delivery**, add the rider's name and phone, update the status, and send your buyer their tracking link.

Source: https://paylead.app/help-center/add-a-physical-product · Updated 2026-11-05

---

## Add a pricing table to your website

> Show your subscription plans side by side on your own website, with a Subscribe button on each.

You need at least one [subscription product](/help-center/sell-a-subscription).

1. Go to **Settings → Developers → Embeds**.
2. Choose **Subscription plans**.
3. Tick the plans to show (up to 4) and click **Highlight** on the one you want to stand out. It gets a "Most popular" badge.
4. Set the colour, theme (light, dark or matching the visitor's device) and corners.
5. Copy the HTML and paste it on your site.

Each plan shows its price, how often it renews, and the lines under **What subscribers get** on the product.

### For apps

If you're adding the table to an app where people are signed in, replace `YOUR_USER_ID` in the code with the signed-in user's id. It comes back on their subscription, so your app knows who paid. The developer docs explain [how to check access](/developers/docs/access-check).

Source: https://paylead.app/help-center/add-a-pricing-table-to-your-website · Updated 2026-10-12

---

## Add a tip button to your website

> A floating "Support me" button on every page of your website. Fans tip by mobile money or card without leaving.

First [set up your tip page](/help-center/set-up-your-tip-page) and make sure it's turned on.

1. Go to **Settings → Developers → Embeds** and choose **Your store**.
2. Choose **Tip button**.
3. Set the words on the button, its colour, and which bottom corner it sits in.
4. Copy the HTML and paste it once on your site, ideally in the footer so it shows on every page.

Tapping the button opens your tip page over the site, with your suggested amounts, message box and goal if you have one. Every tip lands in your payouts like any other sale.

Prefer your own button? Use `data-paylead-tip` on any button or link instead. The [developer docs](/developers/docs/store-newsletter-and-tips) show how.

Source: https://paylead.app/help-center/add-a-tip-button-to-your-website · Updated 2026-10-12

---

## Add a webinar sign-up to your website

> Put your webinar's date, a live countdown and a Register button on your own website.

You need a [webinar](/help-center/set-up-a-webinar).

1. Open the webinar and click **Embed**, or go to **Settings → Developers → Embeds** and pick it.
2. Choose **Webinar sign-up**.
3. Set the button text, colour, theme and corners.
4. Copy the HTML and paste it on your site.

Visitors see when the webinar starts in their own time, with a countdown, and tap **Register**. Free webinars only ask for their details; paid ones take payment over your page. Everyone who registers gets your usual reminders and the join link.

For evergreen webinars, the box shows the next session and visitors can pick another time after they register.

Source: https://paylead.app/help-center/add-a-webinar-signup-to-your-website · Updated 2026-10-12

---

## Add order bumps and upsells

> Offer a tick-box add-on in checkout, or one more product right after payment.

Open **Products → Upsells** to create offers.

### Order bump

A tick-box inside checkout, just before payment: "Yes, add the recipe card for GH₵ 20."

1. Click to create an offer and choose **Order bump**.
2. Pick the product to offer, or describe a simple extra.
3. Choose whether it shows with **every product** or only with the products you pick.
4. Set a special price or a percentage off.

### Upsell after payment

An offer shown right after the buyer pays. Their details are already filled in, so they only approve the new payment. For pay-on-delivery orders the offer joins the same delivery. It appears on the same receipt as the first order.

### Pairs with

A cross-sell shown on the product page, for things that go well together.

### Tips

Keep bumps small and obviously useful with the main item. Offer one upsell at a time.

Source: https://paylead.app/help-center/add-order-bumps-and-upsells · Updated 2026-10-12

---

## Add Paylead to your WordPress site

> Install the Paylead plugin and sell on WordPress with shortcodes: Buy buttons, booking calendars, courses, pricing tables, donation boxes and more.

1. In Paylead, go to **Settings → Developers → Embeds** and click **Download plugin**.
2. In WordPress, go to **Plugins → Add New Plugin → Upload Plugin**. Choose the file you downloaded, click **Install Now**, then **Activate**.
3. In WordPress, go to **Settings → Paylead** and enter your store address, the end of your store link. You can paste the whole link.
4. Back in Paylead, open a product and click **Embed**. Choose how to show it, then open the **WordPress** tab and copy the shortcode.
5. In WordPress, add a **Shortcode** block to your page, paste the shortcode and update the page.

Buyers pay with mobile money or card without leaving your site.

### Shortcodes you'll use most

- A Buy button: `[paylead_buy code="k3x9pa"]Buy now[/paylead_buy]`
- A booking calendar: `[paylead_booking code="k3x9pa"]`
- Your products in a grid: `[paylead_store]`
- A donation box: `[paylead_pay_box link="church-giving" amounts="20,50,100"]`
- A floating Support me button: `[paylead_tip floating="yes"]`

**Settings → Paylead** in WordPress lists every shortcode. To change colours for all of them at once, set **Colour** there.

The plugin only loads Paylead on pages that use a shortcode, so the rest of your site stays fast.

Source: https://paylead.app/help-center/add-paylead-to-wordpress · Updated 2026-10-12

---

## Build a quiz funnel

> Create a quiz that sorts visitors into types of buyer, shows each a personal result, and sells them what fits. Business plan.

Quiz funnels are part of the **Business** plan. New to the idea? Read [what a quiz funnel is](/blog/what-is-a-quiz-funnel).

### Create a quiz

1. Open **Forms & scorecards** and click **New form**.
2. Choose **Quiz funnel** and give it a name.
3. Pick how to start:
   - **Use a template:** a coaching qualifier, a skincare product match, PayLead's own Knowledge Seller quiz, or **Start from scratch**.
   - **Describe it to AI:** the Quiz Architect opens in the builder (see below).
4. Click **Create quiz**. It starts as a draft.

### The builder

The left side has five tabs. The middle shows a live phone preview.

- **Screens:** every screen in order, grouped by section. Click one to edit its words, answers and points. Use **Add a screen** for a new one, and the arrows to move it.
- **Types:** the quiz kind (diagnostic, product match or qualifier), your types of buyer, and for each type: its result, plan steps and offer products.
- **Offer:** plan cards (for packages, plans or a call), questions and answers, your guarantee, and real reviews.
- **Follow-up:** WhatsApp messages for day 0, 1, 3 and 7 and an email for each type, plus ad hooks.
- **Design:** colours, fonts, logo, your link, embed code and webhook.

Use **Preview as** above the phone to see the screens a particular type of buyer gets.

#### Points and types

On picture cards, single choices and statements, each answer can give points to one or more types. After the "lock" screen (set in **Types**), the type with the most points wins. On a tie, the opening question decides.

#### Scoring questions

**Scoring question** screens score 25, 10 or 0. Anything under 25 shows its **gap** and **your fix** on the result. Use **Who sees it** to show each scoring question to one type only.

### Build it with AI

Click **Build with AI** in the builder. The Quiz Architect:

1. reads your products, prices, recent sales, contacts (without names or numbers) and approved reviews;
2. asks you a few questions, up to 3 at a time;
3. shows you a plan to approve;
4. builds the whole quiz.

Nothing changes until you click **Use this quiz**. Products that aren't in your store are removed, and any problems are listed before you apply it. You can keep chatting to change it.

### Publish

Click **Publish**. PayLead checks the quiz first:

- **Red items block publishing:** for example, a type of buyer nobody can reach, or no result screen. The quiz saves as a draft until they're fixed.
- **Amber items are warnings:** for example, a type with nothing to buy, or a plan button with no product.

### Selling from the quiz

On the offer screen, buy buttons open your checkout over the quiz, with the buyer's name and number filled in. Your product's [order bump and after-payment upsell](/help-center/add-order-bumps-and-upsells) show as usual. Pay on delivery shows only if it's on in your store settings.

Purchases, bumps and upsells are linked back to the quiz automatically.

### Share it

Copy your link from **Design**, or use the embed code to put the quiz on your website, in the page or as a pop-up. Ad clicks and UTM tags on your link are saved with each lead. Your store's [Meta and TikTok pixels](/help-center/connect-meta-and-tiktok-pixels) get ViewContent, Lead, InitiateCheckout and Purchase events.

### Leads and insights

Every lead lands in the quiz's entries and your **Customers**, with their type and score. People who tick the consent box get your store's email confirmation before marketing emails reach them.

Click **Insights** to see:

- how many people reached each screen, with the biggest drop flagged;
- leads, purchases and revenue by type of buyer;
- where people came from;
- your latest leads, each with WhatsApp buttons for your follow-up messages.

To send leads to another tool, add a webhook URL in **Design**.

### If you leave the Business plan

Live quizzes keep running and collecting leads. Editing needs the Business plan.

Source: https://paylead.app/help-center/build-a-quiz-funnel · Updated 2026-10-12

---

## Build a sales page with AI

> Describe your offer and Paylead designs a sales page around it, with checkout already wired in.

1. Open **Funnels** and click to create a new funnel.
2. Choose **Build with AI**.
3. Pick the **goal** (sell a product, collect leads, fill a webinar and so on) and the **product**.
4. Describe the offer and who it is for, in your own words.
5. Choose a **look**, or paste the address of a page you like and the AI will match its style.
6. Let it build, then review the page.

### Changing the page

- Click any text to retype it, or click a picture to replace it.
- Ask the AI in the chat for bigger changes: "Make it warmer", "Add the Friday deadline".
- Switch the preview between desktop, tablet and phone.

### Checkout

Every buy button opens your checkout over the page, in the page's colours. In the editor you can try it without paying.

### Publishing

Click **Publish** and the page goes live on your link. The AI only uses products from your store, and prices always come from the product, so they stay correct when you change them.

On the free Starter plan you can have one live funnel, and it can be one built with AI. Pro and Business are unlimited.

Source: https://paylead.app/help-center/build-a-sales-page-with-ai · Updated 2026-10-14

---

## Capture leads with forms

> Build forms and quizzes, embed them on any website, and send each lead to your CRM, your email list or your own systems.

Go to **Forms** to build lead forms, applications, surveys and scorecards (quizzes that give a result).

### Build a form

The builder has three panels: your questions, the design and a live preview. You can ask the AI helper to change things, for example "add a question about budget".

- Question types include text, choices, phone, email and **file upload**.
- Style it with your colours, fonts, button shape and logo.
- Each entry gets its own number (#1, #2, …) for easy reference.

### Stop duplicates

Choose what happens when the same person fills it in twice: **allow**, **warn** or **block**. Paylead matches by email or phone.

### Put it on your website

Use the embed code to show the form on any site, inline or as a popup or slide-in. You can pass hidden fields, prefill answers, and keep the UTM tags from your ads, so you know which ad brought each lead.

### Send leads elsewhere

- Leads land in **Customers** automatically.
- Add a **webhook** to send each entry to another tool.
- Connect your Meta, Google or TikTok pixel so leads count as conversions.

### Manage entries

Filter, export to CSV, set a status (new, contacted, won) and add notes to each entry.

### Example

A real-estate agent runs Facebook ads to a "Find your first home" scorecard. Each lead shows their budget, their area and the ad they came from, and gets an automatic WhatsApp follow-up.

Source: https://paylead.app/help-center/sell-with-forms-and-capture-leads · Updated 2026-11-05

---

## Cart reminders

> Remind buyers who leave checkout by email and SMS, with a link back to their cart.

When a buyer starts checkout and leaves without paying, Paylead reminds them:

- by **email** one hour, one day and three days later,
- by **SMS** with the one-hour and one-day reminders, if they left a phone number.

Each reminder links straight back to their cart. Reminders stop as soon as they pay, and buyers can unsubscribe from cart emails with one click.

### Turning reminders on or off

1. Open **Store Settings → Payments**.
2. Use **Remind shoppers who leave their cart** to turn all reminders on or off.
3. Use **Also text them** to keep the emails but stop the texts.

### Seeing left carts

Open **Orders**, then **Abandoned carts**, to see carts that were left and what was in them.

Source: https://paylead.app/help-center/cart-reminders · Updated 2026-11-05

---

## Choose your alerts

> Decide which alerts you get by email, SMS and in the app: new orders, cash on delivery orders to confirm, failed deliveries, returns, form leads, payouts and more.

Go to **Settings → Notifications** to choose how each alert reaches you.

### Alerts you can get

- **Sales**: new orders, cash on delivery orders to confirm, failed or returned deliveries, return requests, affiliate sales.
- **Leads**: someone filled in a form; sign-ups missed because your contact limit is full.
- **Money**: withdrawals, commissions you earned, SMS credits running low.
- **Account**: plan renewal reminders (always by email).

For each one, tick **Email**, **SMS** and/or **In app**.

### SMS alerts

Alert texts to you (the owner) are free up to a monthly amount on your plan: 20 on Starter, 100 on Pro and 300 on Business. After that they use your SMS credits.

### Tips

- Keep **SMS on for cash on delivery orders**: calling the buyer quickly cuts failed deliveries.
- Use in-app alerts for things that can wait, like form leads, to keep your inbox calm.

Source: https://paylead.app/help-center/notification-settings · Updated 2026-10-12

---

## Configuring Your Custom Domain

> Connect your own branded domain to your Paylead storefront and funnels.

<p>You can connect your own domain (e.g., yourbrand.com) to Paylead to maintain brand consistency.</p>
<h2>DNS Settings</h2>
<p>Add the following records to your DNS provider (Namecheap, GoDaddy, Cloudflare, etc.):</p>
<ul>
<li><strong>A Record</strong>: Name <code>@</code> pointing to <code>76.76.21.21</code></li>
<li><strong>CNAME Record</strong>: Name <code>www</code> pointing to <code>cname.paylead.app</code></li>
</ul>
<p>Once added, navigate to <strong>Settings &gt; Domains</strong> in Paylead and add your domain.</p>

Source: https://paylead.app/help-center/configuring-your-custom-domain · Updated 2026-07-28

---

## Connect your app with the API

> Create an API key so your app or website can check subscriptions, read orders and create payment links.

The developer API is on the **Pro** and **Business** plans. Only the store owner can create keys.

1. Go to **Settings → Developers → API keys**.
2. Enter what the key is for, like "My app", and click **Create key**.
3. **Copy the key now.** It starts with `sk_live_` and is only shown once.
4. Give it to your developer, or put it in your app's server settings.

Keep the key secret: anyone with it can read your orders and customers. Never paste it into website code, a mobile app or a public place.

If a key is lost or shared by mistake, click the bin next to it to delete it, then create a new one. Apps using the old key stop working straight away.

Your developer will find everything they need in the [developer docs](/developers/docs/introduction), starting with the [quick start](/developers/docs/quick-start).

Source: https://paylead.app/help-center/connect-your-app-with-the-api · Updated 2026-10-12

---

## Connect your Meta and TikTok pixels

> Step by step, with every click: get your Meta pixel ID and Conversions API token, paste them into Paylead, and check sales are coming through.

Connecting your pixel lets Facebook, Instagram and TikTok see who bought from your ads. It takes about five minutes. You'll need a Meta business account (free at business.facebook.com).

### Part 1: Get your Meta pixel ID

1. Go to **business.facebook.com/events_manager** and log in.
2. If you already have a pixel (Meta now calls it a **dataset**), click it in the left list. If not, click **Connect data**, choose **Web**, type a name like "My Paylead store" and click **Create**.
3. Your **pixel ID** is the long number under the dataset's name (for example `1119691867196311`). Copy it.

### Part 2: Get your Conversions API token

The Conversions API lets Paylead send each sale to Meta from our servers, so mobile money payments still count when the buyer closes the page.

1. In Events Manager, with your dataset open, click the **Settings** tab.
2. Scroll down to **Conversions API**.
3. Under **Set up manually**, click **Generate access token**.
4. Copy the token. It's long and starts with `EAA`. Keep it private, like a password.

### Part 3: Paste them into Paylead

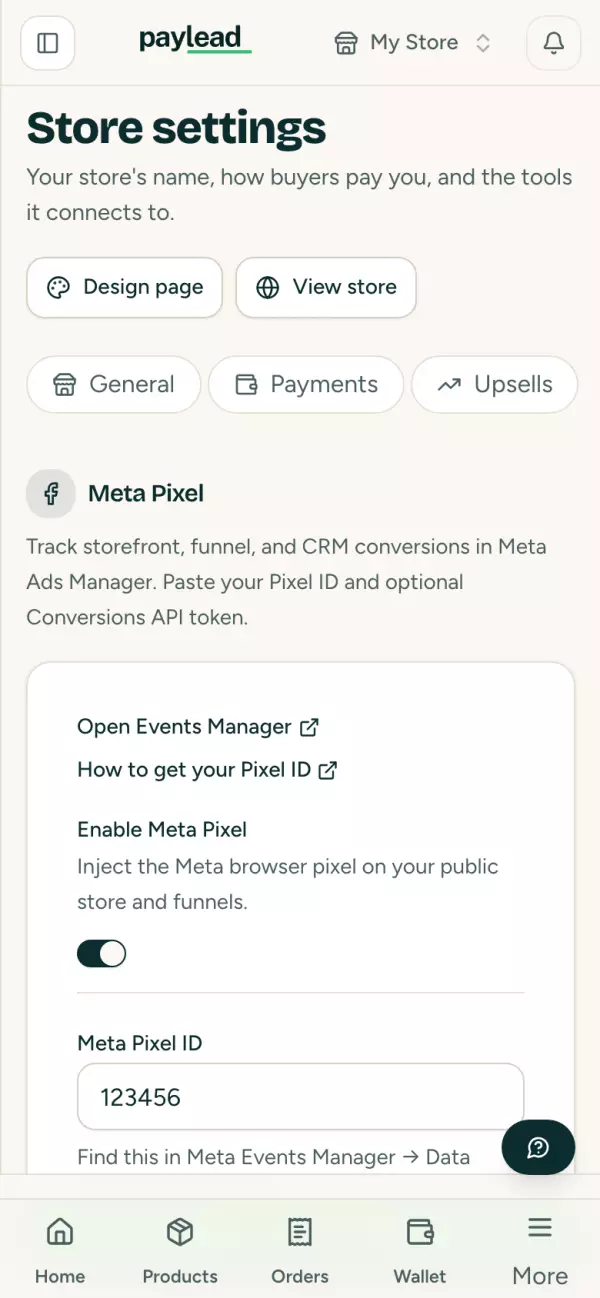
1. In Paylead, open **Store settings**. On your phone, tap **More** at the bottom, then **Store settings**.
2. Tap the **Integrations** tab. On a phone, swipe the row of tabs to the left to find it.
3. Under **Meta Pixel**, make sure **Enable Meta Pixel** is switched on.
4. Paste your pixel ID into **Meta Pixel ID**.
5. Paste your token into **Conversions API access token**.
6. Tap **Save changes**.
![The Meta Pixel section in Store settings → Integrations](/images/help/meta-ads/integrations.webp)

**TikTok:** in the same tab, under **TikTok Pixel**, paste your **TikTok Pixel ID** and, optionally, your **TikTok access token**, then save.

**Building a funnel?** You don't need to leave it. In the funnel editor, tap the **Ad pixels** button at the top (or **Connect** next to "Ad pixel connected" when you publish). On the funnel's page, tap **Pixels**. Paste your pixel ID (or the whole pixel code Meta, TikTok or Google gave you) and your token, then tap **Save pixels**. It's the same setting as Store settings, so every funnel and page in your store uses it.

### What Paylead sends

| Event            | When                                                 |
| ---------------- | ---------------------------------------------------- |
| PageView         | Someone opens your store, a product or a funnel page |
| ViewContent      | Someone opens a product page                         |
| InitiateCheckout | Someone starts checkout                              |
| Purchase         | Someone pays, with the price and currency            |

With the Conversions API token, Paylead sends each purchase from our servers too, the moment the payment is confirmed. The browser and the server use the same event ID, so Meta counts each sale once.

You can turn individual events off under **Tracked actions** in the same tab.

### Part 4: Check it's working

1. In Events Manager, open your dataset and click the **Test events** tab.
2. Under **Website**, type your store link (for example `yourstore.paylead.app`) and click **Open website**.
3. In the window that opens, view a product and place a small test order.
4. Back in Test events you should see **PageView**, **ViewContent**, **InitiateCheckout** and **Purchase** arrive within a minute. Purchases from the Conversions API are marked **Server**.

Nothing showing? Check the pixel ID has no spaces, **Enable Meta Pixel** is on, and you tapped **Save changes**.

### What to do next

- In Ads Manager, optimise your campaigns for the **Purchase** event.
- Want to count one product's sales separately? [Set up a custom conversion](/help-center/set-up-a-meta-custom-conversion).
- Ready to advertise a product? [Promote it with Meta ads](/help-center/promote-a-product-with-meta-ads).

Source: https://paylead.app/help-center/connect-meta-and-tiktok-pixels · Updated 2026-11-04

---

## Connect your own domain

> Use yourbrand.com for your store instead of a paylead.app link.

Custom domains are part of the **Business** plan.

1. Open **Store Settings → Domains & Plans**.
2. Add your domain, for example `shop.yourbrand.com`.
3. Paylead shows the DNS record to add: its **type**, **name** and **value**.
4. Sign in where you bought your domain and add that record exactly as shown.
5. Come back and check the domain. Once the record is found, Paylead sets up the secure certificate.

DNS changes can take from a few minutes to a few hours to spread. Your paylead.app link keeps working the whole time.

Source: https://paylead.app/help-center/connect-your-own-domain · Updated 2026-10-12

---

## Create a bundle

> Sell several products together at one price. Buyers receive everything inside.

1. Click **Create product** and choose **Bundle**.
2. Give the bundle a name, image and description.
3. In **What's in the bundle**, add products from your store and set how many of each.
4. Set the bundle price. Paylead shows what the items cost bought one by one, and how much buyers save.
5. Click **Create product**.

### What can go in a bundle

Physical products, digital downloads, courses and webinars. Bookings and services need the buyer to choose a time or package, so they are sold on their own.

### What buyers receive

Everything inside: download links, course access, webinar seats, and delivery for physical items. Physical items come off your stock, and the bundle stops selling when one of them runs out.

Source: https://paylead.app/help-center/create-a-bundle · Updated 2026-10-12

---

## Create a payment link

> Get paid by mobile money or card with a link: no product page needed. Fixed or open amounts, limits and expiry dates.

A payment link is the fastest way to collect money. You don't need a product or a store page. Share it on WhatsApp, Instagram or by SMS and the buyer pays by mobile money or card.

### When to use one

- A client owes you for a logo, a deposit or a consultation.
- You sell in your WhatsApp status and want buyers to pay before you deliver.
- You collect dues, contributions or event fees.

### Create it

1. Click **Get paid** in the sidebar, then **New payment link**.
2. Give it a title buyers will see, for example "Wedding photography deposit".
3. Choose the amount:
   - **Fixed**: everyone pays the same, for example GH₵ 500.
   - **Open**: the buyer types what they pay, for example donations or "pay what you owe".
4. Optional settings:
   - **One payment only** or **reusable**.
   - **Limit**: stop after a number of payments (for example 50 event tickets).
   - **Expiry date**: stop taking payments after a date.
   - **Collect email**: ask the buyer for their email address.
5. Save and copy the link, or download its **QR code** to print.

### Fees

Online payments cost 4% + GH₵ 1, the same as any sale. Buyers paying online add 2% processing, unless you cover it in your store settings.

### Example

Ama runs a hair salon. She makes a reusable link "Braids deposit: GH₵ 100", prints the QR code at her front desk and pins the link on her Instagram bio. Every deposit shows up in her orders with the client's phone number.

Pause a link at any time with its on/off switch.

Source: https://paylead.app/help-center/create-a-payment-link · Updated 2026-11-16

---

## Create an online course

> Build sections and lessons with video, text and links. Students get access right after paying.

1. Click **Create product** and choose **Course**.
2. Add the course name, a cover image, a description and the price.
3. In **Lessons**, add sections, then lessons inside each section. Each lesson can be:
    - **Video**: paste a YouTube, Vimeo, Loom or direct video link,
    - **Text**: write the lesson right there,
    - **Link**: point to a template, tool or community.
4. Click **Create product**.

### What students see

After paying, students get a private course link on their receipt and by email. The course player shows their progress, the next lesson and a **Mark complete** button, and remembers where they stopped.

### Changing the course later

Edit the course to add, rename or reorder lessons. Students keep their progress.

### Selling it

Your course has a product page straight away. For a launch page, use the **Cohort** template or ask the AI: see [Use a funnel template](/help-center/use-a-funnel-template).

Source: https://paylead.app/help-center/create-an-online-course · Updated 2026-10-12

---

## Create discount codes

> Make promo codes for a percentage off, an amount off, or free delivery.

1. Open **Products → Discounts & Coupons**.
2. Click to create a coupon and enter the **code**, for example `EASTER20`.
3. Choose the type: **percentage**, **fixed amount** or **free shipping**, and the value.
4. Optional limits:
    - a **minimum order** amount,
    - a **maximum discount**,
    - how many times it can be used in total, and per customer,
    - **start** and **end** dates.
5. Save.

Buyers enter the code in checkout under **Have a promo code?**. Turn a code off at any time without deleting it.

### On subscriptions

Codes work on the subscribe page too. They take money off the first payment. Turn on **Keep it on every renewal** to take it off every payment instead, for example "50% off for life" for your first members.

Source: https://paylead.app/help-center/create-discount-codes · Updated 2026-10-12

---

## Create forms and scorecards

> Collect leads with multi-step forms and scored quizzes, and embed them anywhere.

Open **Forms & Scorecards**.

Want a full sales quiz that sorts people into types of buyer and sells to each one? See [Build a quiz funnel](/help-center/build-a-quiz-funnel) (Business plan).

### A lead form

1. Create a form, or describe the form you need and let the AI draft it.
2. Add questions: name, email, phone, short and long answers, choices.
3. Split long forms into steps so more people finish.
4. Choose what happens after: a thank-you message or a page to send people to.

### A scorecard

A scorecard is a quiz that scores each answer and shows a result, like "Is your business ready to sell online?". Give each answer points, then set the results for each score range.

### Using your form

- Add it to a funnel page.
- Share its own link.
- Embed it on another website with the snippet in the form's **Share** options.

Every response lands in **Customers** as a lead, and can start an email automation; see [Email automations](/help-center/email-automations).

Source: https://paylead.app/help-center/create-forms-and-scorecards · Updated 2026-10-12

---

## Create your Paylead account

> Sign up free, confirm your email and get your store link in a few minutes.

Paylead is free to start. You do not need a card.

### Sign up

1. Go to [paylead.app/get-started](/get-started) and answer a few quick questions about what you sell.
2. Enter your name, email and a password, or continue with Google.
3. Check your inbox for a six-digit code and enter it to confirm your email.

You start on the free **Starter** plan. Pro and Business both have a 14-day free trial when you want more.

### What happens next

Paylead opens your dashboard with a short setup checklist: name your store, pick a look and add your first product. Each step takes a minute or two, and you can come back to any of them later.

### Next steps

- [Set up your store](/help-center/set-up-your-store)
- [Add your first product](/help-center/add-a-physical-product)

Source: https://paylead.app/help-center/create-your-paylead-account · Updated 2026-10-12

---

## Creating Products

> Learn how to create physical, digital, service, booking, and bundle products.

<p>Paylead simplifies inventory and catalog management. Navigate to <strong>Products &gt; Create Product</strong> to configure your inventory.</p>
<h2>The 5 Product Types</h2>
<ul>
<li><strong>Physical Product</strong>: Requires dimensions, shipping weights, and inventory levels.</li>
<li><strong>Digital Product</strong>: Allows file attachment uploads (PDFs, templates, keys).</li>
<li><strong>Service</strong>: For custom deliverables (consulting, development, design).</li>
<li><strong>Booking</strong>: Syncs with calendar software. Restricts purchases to open calendar intervals.</li>
<li><strong>Bundle</strong>: Combines pre-existing products into a single SKU with package discounts.</li>
</ul>
<h2>Pricing Strategies</h2>
<p>Every product form displays a default <strong>Price</strong> and a secondary <strong>Compare at Price</strong>. Set the <em>Compare at Price</em> exactly 50% to 100% higher than the sale price to generate crossed-out badges showing calculated savings.</p>

Source: https://paylead.app/help-center/creating-products · Updated 2026-07-28

---

## Design your store page

> Change your store's look, colours, logo and sections with a live preview, and give single products their own look.

Go to **Store → Design** (`/dashboard/store/design`). The screen is split: your settings on the left, a live preview on the right.

### What you can change

- **Look**: pick a ready-made style for your whole store.
- **Brand colour**: Paylead checks the contrast so your buttons stay easy to read.
- **Logo**: it keeps its real shape. A wide logo stays wide; nothing is cropped into a circle.
- **Sections**: show or hide your product list, about section, reviews and a **subscribe form** that collects emails.

### A different look for one product

In a product's editor you can switch on the preview and give that product its own look, or keep the store's look.

### Example

A skincare seller picks a soft, light look with her brand pink, adds her logo and turns on the subscribe form with "Get 10% off your first order". New visitors join her list even if they don't buy today.

### Tips

- Use one brand colour, consistently.
- Check the preview on the phone view: most buyers in Ghana shop on their phones.

Source: https://paylead.app/help-center/design-your-store-page · Updated 2026-10-12

---

## Edit your page

> Click to change words and pictures, ask the AI for bigger changes, or edit the code.

Open a funnel from **Funnels** to edit it.

### Quick changes

- **Text**: click any heading, paragraph or button and type.
- **Pictures**: click an image to upload a new one.

### Bigger changes

Use the chat next to your page: "Add three testimonials under the price", "Make the page darker", "Add a section about delivery times". The AI changes the page and tells you what it did.

### Preview

Switch between desktop, tablet and phone. Try the checkout; nothing is charged in the editor.

### Edit the code

Every page is real React and Tailwind code. Open the files to change anything. Buy buttons, prices and forms are small Paylead pieces, so they keep working whatever you change.

### Publish

Click **Publish** to put your changes live.

Source: https://paylead.app/help-center/edit-your-page · Updated 2026-10-12

---

## Email automations

> Follow up automatically after an order, a sign-up or a left cart.

Open **Automations** in the sidebar to build an automation.

### Start when…

- **Someone orders**,
- **Someone signs up** through one of your forms,
- **Someone leaves a cart** without paying.

### …then

- **Wait** a number of minutes, hours or days,
- **Check** a condition, and only continue if it is true,
- **Send an email**.

Chain as many steps as you need. For example: when someone buys your ebook, wait three days, then email them about your course.

Turn an automation off at any time; it stops for everyone.

Source: https://paylead.app/help-center/email-automations · Updated 2026-11-05

---

## Get help from the Paylead team

> Use the Help button in your dashboard to find a quick answer, or chat live with a person on the team.

### The Help button

Every page of your dashboard has a **Help** button in the bottom-right corner (above the tab bar on your phone). You'll also find it on **Help & support** in your account menu.

1. **Pick a topic**: getting paid, orders and delivery, your store, SMS and email, or your account.
2. **Pick the issue**. You'll see a quick answer, a button to the screen that fixes it and any help guides on the subject.
3. **Did it solve it?** If yes, you're done. If not, tap **No, chat with us**.
4. **Answer a few questions.** For example, for a missing withdrawal you pick the withdrawal from your list and type the number it should go to. This means we don't have to ask you again.
5. **Describe the problem** and start the chat.

### Chatting with us

- When someone is online you'll see it, and replies arrive in the chat within minutes.
- Outside our hours (8:00 to 20:00, Monday to Saturday, Accra time) leave your message; we email you when we reply.
- You can close the chat. A dot on the Help button tells you when we've replied.
- Tap **My problem is solved** when you're done. Reply again any time to reopen it.

All your conversations are listed on the **Help & support** page.

### To get help faster

- Include order numbers, amounts and times.
- One problem per chat.

Source: https://paylead.app/help-center/get-help-from-paylead · Updated 2026-10-12

---

## Handle return requests

> Buyers can ask to return a delivered item within 7 days. You approve or reject it from the order; refunds are paid by the Paylead team.

### How buyers ask

On their order page, buyers of a delivered physical order see **Problem with your order? Ask for a return**. They have **7 days after delivery**. They pick a reason (damaged, wrong item, not as described, doesn't fit, missing parts), choose **money back** or **a replacement**, describe the problem and can add up to 3 photos.

You get an alert by email, SMS and in the app.

### What you do

Open the order from **Orders**. The return shows the buyer's reason, note and photos.

- **Approve return**: you'll arrange for the item to come back.
- **Reject**: write a short reason; the buyer gets it by email.
- **I got the item back**: once it's returned.
- **Close return**: when everything's settled.

The buyer is emailed at every step.

### Refunds

Refunds are never automatic. When a refund return is marked received, the Paylead team sends the buyer's money back and tells you when it's done. For a replacement, send the new item yourself.

### Tips

- Answer within a day: quick answers stop buyers from disputing the payment.
- Ask for a photo of the damage before approving costly items.
- Put your return policy in your product description so buyers know what to expect.

Want to turn off email or SMS alerts for returns? Go to **Settings → Notifications**.

Source: https://paylead.app/help-center/handle-returns · Updated 2026-11-05

---

## Invite your team

> Give staff their own login with only the access they need.

1. Open the account menu at the bottom of the sidebar and choose **Team**.
2. Invite a member by email.
3. Choose their **role**. Roles decide what they can see and change.
4. They get an email to join your store.

Create your own roles in **Team → Roles**, for example "Orders only" for someone who packs and ships.

The Business plan includes 5 staff accounts.

Source: https://paylead.app/help-center/invite-your-team · Updated 2026-10-12

---

## Keep your embeds on your own website

> Stop other websites from showing your checkout, product cards or pricing tables.

By default, anyone who copies your embed code can show it on their site. To allow only your own websites:

1. Go to **Settings → Developers → Embeds**.
2. Under **Where your embeds can appear**, enter your websites, one per line:

```
mysite.com
www.mysite.com
*.mysite.com
```

3. Click **Save websites**.

`*.mysite.com` covers every subdomain (like `shop.mysite.com`), but not `mysite.com` itself, so list both if you use both.

Browsers then refuse to show your embeds anywhere else. To allow any website again, empty the box and save.

Your Paylead store, product pages and links aren't affected: this only applies to embeds on other websites.

Source: https://paylead.app/help-center/lock-embeds-to-your-website · Updated 2026-10-12

---

## Let affiliates sell for you

> Turn on affiliates and other people promote your products for a commission. You approve them, set the rate and only pay when they sell.

Affiliates are people who share your product with their own audience and earn a commission when someone buys. You pay nothing until a sale happens.

### Turn it on

1. Go to **Affiliates** in your dashboard.
2. Switch on your affiliate program and set the default **commission**, for example 20%.
3. Choose which products affiliates can sell: one product, a few, or your whole store. You can also use the switch on a product in your product list.
4. Decide whether affiliates join instantly or need your approval.

Your products then appear in the **Affiliate marketplace**, where affiliates find things to promote.

### Manage your affiliates

- See every affiliate, their clicks, sales and earnings.
- **Approve** or **block** people.
- Give your best affiliates a **higher rate**.
- Share your recruit page so fans can sign up as affiliates.

### How affiliates get paid

When an affiliate's link brings in a paid sale, their commission is recorded automatically. Commissions also count on order bumps and upsells taken in that order.

### Example

Kofi sells a GH₵ 300 forex course. He gives affiliates 30%. A popular trading page shares its link and sells 20 copies: Kofi earns GH₵ 4,200 after the commission, from buyers he would never have reached.

### Tips

- Give affiliates ready-made images and captions.
- Start at 20–40% for digital products; physical products usually need less.

Source: https://paylead.app/help-center/run-an-affiliate-program · Updated 2026-10-12

---

## Manage your customers

> See every buyer and lead, their orders and lifetime value, and message them.

Open **Customers** in the sidebar.

### Who is in the list

- Every **buyer** is added when they order.
- Every **lead** is added when they fill in one of your forms.
- You can **add a customer** yourself.

### A customer's page

Click a customer to see their contact details, every order, what they have spent in total (lifetime value) and their tags.

### Reaching them

Send email and SMS campaigns to your customers from **Messages**, or let **Automations** follow up for you.

The free Starter plan keeps up to 150 contacts; Pro and Business are unlimited.

Source: https://paylead.app/help-center/manage-customers · Updated 2026-11-05

---

## Manage your subscribers

> See who is subscribed, who is due to renew and what subscriptions bring in each month. Cancel a subscription for someone.

Go to **Get paid → Subscriptions**.

### The list

At the top you see:

- **Monthly revenue**: what your active subscriptions bring in each month.
- **Subscribed**: how many people are paid up or in their grace period.
- **Renewal due**: people whose period has ended and who are in the 3-day grace period.

Filter by status (Active, Renewal due, Cancelled, Ended), by product, or search by name, email, phone or your app's ref.

### A subscriber's page

Click someone to see:

- when it renews and when their access ends,
- every payment they've made, and what you kept,
- their subscription page link, where they renew or cancel. Every reminder links there, so you only need it if they ask.

### Cancel for someone

On their page, click **Cancel**. It won't renew, and we let them know by email. They keep access until the end of the period they paid for. If they're already in their grace period, access ends now.

### What the statuses mean

| Status | Meaning |
|---|---|
| Active | Paid up |
| Cancelling | Cancelled, but still has access until the paid period ends |
| Renewal due | The period ended. They have 3 days to renew |
| Cancelled | They cancelled and the paid period ran out |
| Ended | Not renewed in time |

Source: https://paylead.app/help-center/manage-subscribers · Updated 2026-10-12

---

## Move your store to Paylead (imports)

> Bring your products and customers from Selar, Gumroad, Stan, Shopify, WooCommerce or any spreadsheet in a few minutes.

You don't have to rebuild your store by hand. Go to **Imports** in your dashboard (or pick **Switch to Paylead** during sign-up).

### Platforms you can import from

Selar, Gumroad, Stan, Shopify, WooCommerce, or any CSV or Excel file.

### How it works

1. Pick the platform you're coming from.
2. Export your products or customers there and upload the file. Paylead recognises the columns automatically.
3. Check the column matching preview and change anything that's wrong.
4. Start the import. You can watch the progress, and any rows that couldn't be imported are listed in an error report you can download.

### Products

Products are imported as **drafts** with their name, price and type. Each one gets a short checklist to finish it: add a picture, upload the file and write a description. Products that were hidden or switched off on your old platform stay hidden.

**Example:** a Selar export with 25 ebooks becomes 25 draft digital products. Upload each PDF, publish, and you're selling.

### Customers

Customers are added to your contacts. Duplicates are matched by email and phone, and phone numbers are tidied into the 233 format. They're tagged with where they came from (for example `imported:selar`).

Importing customer lists and products is free on every plan. The free plan emails up to 150 people at once.

### After the import

Tell your customers you've moved: send them your new store link by email or SMS, and update the link in your bios.

Source: https://paylead.app/help-center/switch-to-paylead · Updated 2026-11-18

---

## Offer pay on delivery

> Let buyers pay for physical orders when they arrive.

1. Open **Store Settings** and go to the **Payments** tab.
2. Turn on **Enable Cash on Delivery (COD)**.
3. Save.

Buyers ordering physical products now choose between **Pay now** and **Pay on delivery** in checkout. Digital products, courses, webinars and bookings are always paid upfront.

### Handling the order

1. Open the order in **Orders**. It shows the delivery address, phone number and the amount to collect.
2. Under **Delivery**, add your rider's name and phone.
3. Update the status as it goes out, and send the buyer their tracking link so they can follow the delivery.

The buyer's confirmation (by email, and by SMS when they leave a number) tells them the amount to pay the rider.

### Fees

Pay-on-delivery sales cost **2% + GH₵ 1**, taken from your wallet once you mark the order paid. There's no payment-processing fee because you collect the cash yourself.

### When the buyer isn't home

Buyers can pick a new delivery day from their order page (**Not home? Pick another day**). You get an alert with the new day and their note.

### Tips to cut failed deliveries

- Call or WhatsApp the buyer before you send the rider. Keep SMS alerts on for orders to confirm.
- Ask for a small deposit with a [payment link](/help-center/create-a-payment-link) on expensive items.
- Add a clear landmark field to your checkout.

### Offers after the order

If a pay-on-delivery buyer accepts an offer after ordering, it is added to the same delivery.

Source: https://paylead.app/help-center/offer-pay-on-delivery · Updated 2026-11-05

---

## Payouts and withdrawals

> Withdraw your sales to mobile money or a bank account. It arrives the next working day.

Every sale goes into your Paylead wallet. Open **Payouts** in the sidebar to see your balance and history.

### Set up your payout account

Add the mobile money wallet or Ghanaian bank account you want to be paid into. It should be in your name or your business's name.

### Withdraw

1. In **Payouts**, click **Withdraw**.
2. Enter the amount. The smallest withdrawal is **GH₵ 50**.
3. Confirm.

The money arrives the **next working day**. Each withdrawal costs a flat **GH₵ 5**, taken from your wallet with the amount.

### Money on its way

Sales you make today appear under **Money on its way** with the date they'll land. They become withdrawable by **03:00 the next morning**. Cash on delivery orders count once you mark them **delivered and paid**.

### What comes off each sale

- Online (mobile money or card): **4% + GH₵ 1** (buyers paying online add 2% processing).
- Cash on delivery or pay later: **2% + GH₵ 1**.

**Example:** on Monday you sell three GH₵ 100 products online. Each fee is GH₵ 5, so GH₵ 285 shows as money on its way and is yours to withdraw on Tuesday morning. Withdraw it all and GH₵ 280 arrives (after the GH₵ 5 withdrawal fee).

Want a round amount in hand? Raise your price a little. See [Plans and fees](/help-center/plans-and-fees).

### Withdrawal not arrived?

Check its status under **Payouts → History** and that your payout number is right. Still stuck? Use the **Help** button in your dashboard and pick **My withdrawal hasn't arrived**.

Source: https://paylead.app/help-center/payouts-and-withdrawals · Updated 2026-11-16

---

## Pixel Tracking & Conversions API Setup

> Connect Meta Pixel, TikTok Pixel, and server-side Conversions API to track ad performance on your store and funnels.

<p>Paylead supports native browser pixel tracking and server-side event APIs for both Meta and TikTok. This guide walks you through configuring each one in your Store Settings.</p>
<h2>Overview</h2>
<p>Navigate to <strong>Store Settings</strong> in the sidebar and scroll to the <strong>Pixels &amp; Tracking</strong> section.</p>
<h2>Meta Pixel Setup</h2>
<ol>
<li>Toggle <strong>Enable Meta Pixel</strong> to ON.</li>
<li>Enter your <strong>Meta Pixel ID</strong>.</li>
<li>Click <strong>Save</strong>.</li>
</ol>
<h2>Meta Conversions API (CAPI)</h2>
<p>For the best ad tracking accuracy, enable server-side event tracking alongside the browser pixel. This sends Purchase, Checkout, and Lead events directly from Paylead's servers to Meta.</p>
<ol>
<li>Generate a Conversions API access token in Meta Events Manager.</li>
<li>Paste it into the <strong>Conversions API access token</strong> field.</li>
<li>Click <strong>Save</strong>.</li>
</ol>

Source: https://paylead.app/help-center/pixel-tracking-conversions-api-setup · Updated 2026-07-28

---

## Plans and fees

> Starter is free, Pro is GH₵ 149 a month and Business GH₵ 399. Online sales cost 4% + GH₵ 1 and buyers add 2% processing (or you cover it); cash on delivery is 2% + GH₵ 1. How to price so you keep more.

### Plans

| | Starter | Pro | Business |
|---|---|---|---|
| Price | Free | GH₵ 149 a month | GH₵ 399 a month |
| Store, checkout, all product types | Yes | Yes | Yes |
| Live funnels | 1 at a time (from a template, or 1 built with AI) | Unlimited | Unlimited |
| Customer contacts | 150 | Unlimited | Unlimited |
| Pay on delivery | Yes | Yes | Yes |
| WhatsApp automations | No | Yes | Yes |
| Remove Paylead branding | No | Yes | Yes |
| Your own domain | No | No | Yes |
| Staff accounts | 1 | 1 | 5 |

Pro and Business start with a **14-day free trial**. Change plans under **My Account → Billing & Plans**.

#### Your plan gets cheaper the longer you stay

Every month you renew on time takes **5% off** your next payment, up to **40% off**. If a renewal fails, your paid features stay on for **3 days** while you sort it out. Miss that and the discount starts again from zero.

### Fees per sale

| How the buyer pays | Fee |
|---|---|
| Mobile money or card, online | **4% + GH₵ 1** (the buyer also pays 2% payment processing on top) |
| Cash on delivery or pay later | **2% + GH₵ 1** |

The minimum fee is GH₵ 2.

**Example:** you sell a GH₵ 200 ebook online. The buyer pays GH₵ 204 (your price + 2%). Your fee is 4% of 200 (GH₵ 8) + GH₵ 1 = **GH₵ 9**, so you receive GH₵ 191.

Buyers see one **Transaction fee** line at checkout. Totals with a fee are rounded up to a whole cedi.

#### Who pays the 2% processing

By default, buyers paying online add **2% processing** at checkout. Prefer buyers to pay exactly your price? Turn on **Cover the 2% processing fee for buyers** in **Store settings → Checkout**. The 2% then comes out of your sale: on a GH₵ 200 sale the buyer pays GH₵ 200 and you receive GH₵ 187.08.

Paylead's 4% + GH₵ 1 always comes out of your sale.

### Price so you keep more

- **Want a round amount in hand? Raise your price a little.** Want GH₵ 200? Price it at GH₵ 210 and you get GH₵ 200.60. When you set a price, tap **GH₵ … if you want GH₵ …** under it and we set the price for you.
- **Use a compare-at price for real sales.** Set your regular price as the compare-at price and buyers see it crossed out next to your sale price. Only use a price you really charge, or buyers (and ad platforms) stop trusting it.
- **Bundle small items.** The GH₵ 1 part of the fee and the GH₵ 2 minimum take a bigger share of small prices. Five GH₵ 10 items as one GH₵ 50 bundle keep far more for you.

### Withdrawals

- **GH₵ 5 per withdrawal**.
- Today's sales show as **Money on its way** and become withdrawable by 03:00 the next morning.
- Cash on delivery orders count once you mark them delivered and paid.

See [Payouts and withdrawals](/help-center/payouts-and-withdrawals).

### Paylead Credit

You earn **Paylead Credit** back on every sale fee: 10% of Paylead's share. It pays for your plan and SMS, it can cover a whole month's renewal, and it lasts 12 months. You also get GH₵ 5 for your first sale.

Selling a lot every month? [Talk to us](/company/contact) about a lower rate.

Source: https://paylead.app/help-center/plans-and-fees · Updated 2026-11-16

---

## Promote a product with Meta ads

> Every tap, from opening the Promote panel to a live Facebook and Instagram ad: tracking, your AI ad kit, and launching in Ads Manager.

Every product on Paylead has a **Promote with Meta ads** panel. It takes you through three steps: **Track**, **Ad kit** and **Launch**.

### Open the panel

You can open it three ways:

- **Right after you create a product:** tap **Promote with Meta ads** on the dark banner at the top of your product list.
- **From the product:** open **Products**, tap the product, then tap the green **megaphone** at the top of the page.
- **From your product list:** tap **⋯** next to a product, then **Promote with Meta ads**.

![The green megaphone opens Promote with Meta ads](/images/help/meta-ads/promote-button.webp)

### Step 1: Track

The panel checks two things:

- **Meta pixel:** shows **On** when your pixel is connected.
- **Conversions API:** shows **On** when your access token is added.

If either says **Not set up**, tap the button under it (**Add my Meta pixel** or **Add my access token**). It opens **Store settings → Integrations**. Follow [connect your Meta and TikTok pixels](/help-center/connect-meta-and-tiktok-pixels), then come back.

![The Track step](/images/help/meta-ads/track.webp)

The grey box shows what to pick in Ads Manager: **Sales → Website → Purchase**. Want a custom conversion instead? Tap **Using a custom conversion instead?** ([how](/help-center/set-up-a-meta-custom-conversion)).

Tap **Next: your ad kit**.

### Step 2: Ad kit

1. Tap **Write my ad kit** at the bottom. It takes about 20 seconds.
2. Your kit opens in three tabs: **Headlines**, **Ad text** and **Creatives**.
3. Tap **Copy** next to anything you want to use. It turns green when it's copied.

![Before and after writing your ad kit](/images/help/meta-ads/kit-empty.webp)

What you get:

|                                                    | Starter | Pro and Business |
| -------------------------------------------------- | ------- | ---------------- |
| Headlines (under 40 characters)                    | 2       | 8                |
| Ad texts (short, story, problem → solution, offer) | 1       | 4                |
| Creative ideas with a 3-second hook                | 1       | 4                |
| Who to target: places, ages and interests          |         | ✓                |
| A daily test budget and when to spend more         |         | ✓                |
| A win-back plan for visitors who didn't buy        |         | ✓                |

![Your headlines, ready to copy](/images/help/meta-ads/kit-headlines.webp)

On Starter, the rest of the kit shows as **locked**. Paylead has already written it: tap **Upgrade to Pro** and the full brief appears straight away, without using another AI write.

![The full campaign brief on Pro](/images/help/meta-ads/pro-brief.webp)

Good to know:

- Each kit uses **one AI write** from your monthly allowance. You can see how many you have left under the kit.
- The kit is saved on the product, so opening it again is free.
- **Write a new kit** gives you fresh ideas and uses another AI write.
- The AI only uses what's in your product listing and never makes up reviews, results or numbers. A clear product description gives you better ads.

Tap **Next: launch it**.

### Step 3: Launch

The panel gives you a checklist. Tap the number next to each step to tick it off as you go. Paylead remembers where you got to on that phone or computer.

1. **Create a Sales campaign:** in Ads Manager, tap **+ Create**, choose **Sales**, then **Continue**.
2. **Point it at your sales:** in the ad set, set **Conversion location** to **Website**, pick your pixel and choose **Purchase** (or your custom conversion).
3. **Set a small test budget:** on Pro, the panel shows the daily amount for this product.
4. **Build the ad:** paste a headline and ad text from your kit, add your photo or video, tap **Copy** next to your product link and paste it as the **Website URL**. Use the call-to-action button the panel suggests.
5. **Publish and wait:** tap **Publish**, then give it 3 to 5 days before you judge it.

![The launch checklist](/images/help/meta-ads/launch.webp)

Tap **Open Ads Manager** at the bottom to go straight there.

### After a few days

In Ads Manager, add the **Purchases** and **Cost per purchase** columns. Keep the ads that sell at a cost you're happy with, switch off the rest, and put more money behind the winner.

### Questions

**I don't see the megaphone.** It appears once a product is saved. Finish creating the product, then open it again.

**"You can't write the kit."** Writing a kit needs permission to edit products. Ask your store owner to check your role.

**"No AI writes left this month."** Your allowance resets on the 1st. Upgrade for more writes each month.

**Can I use the kit for TikTok or WhatsApp too?** Yes. The headlines, ad text and creative ideas work anywhere you post.

Source: https://paylead.app/help-center/promote-a-product-with-meta-ads · Updated 2026-10-17

---

## Sell a digital download

> Upload a file once and every buyer gets a secure download link the moment they pay.

1. Click **Create product** and choose **Digital Product**.
2. Add a name, a cover image and a description.
3. Set the price: a fixed price, pay what you want, or free.
4. Under **Digital Delivery**, choose **File Download** and upload your files (PDF, ZIP, spreadsheets, audio or video), or choose **Redirect URL** to send buyers to a page or folder after they pay.
5. Click **Create product**.

### What buyers get

The download links appear on their receipt and in their confirmation email right after they pay. Buyers can also find everything later in **My purchases**.

### Protect your files

Once the product is created, open it from **Products**. Under **Digital Delivery**, the **Protect your files** box lets you:

- **Ask for a password before downloading.** We put the password in the buyer's order email, and they type it on their receipt before the files open. People who bought before you turned it on need it too, so send it to them.
- Choose how long **each buyer's download link works**: forever, a number of days after they buy, until a date, or a number of downloads.

Link limits apply to new orders. Buyers see on their receipt how many downloads they have left.

### Selling ebooks well

Give your ebook its own sales page: see [Build a sales page with AI](/help-center/build-a-sales-page-with-ai).

Source: https://paylead.app/help-center/sell-a-digital-download · Updated 2026-11-05

---

## Sell a service with packages

> Offer up to three packages with a price, delivery time and revisions, and collect the brief at checkout.

Services are work you deliver after the sale: design, writing, audits, consulting.

1. Click **Create product** and choose **Service**.
2. Add up to three **packages**, for example Basic, Standard and Premium. For each one set the price, the delivery time in days, the number of revisions and what is included.
3. Add **buyer requirements**: the questions you need answered to start, like "Your business name" or "A link to your logo". Each question can be a short answer, a longer answer or a choice from options you set.
4. Click **Create product**.

### After the sale

The buyer picks a package, answers your questions and pays. The order shows in **Orders** with everything they told you, so you can start straight away.

Source: https://paylead.app/help-center/sell-a-service-with-packages · Updated 2026-11-05

---

## Sell a subscription

> Charge every week, month, 3 months or year for a paid group, coaching, signals or your app. Paylead reminds subscribers before each renewal.

Subscriptions are on the **Pro** and **Business** plans.

### Create it

1. Go to **Products → Add product → Subscription**.
2. Give it a name and a short description, and add a picture.
3. Set the **price** and how often it **renews**: every week, month, 3 months or year.
4. Under **What subscribers get**, add one line for each thing they get. These show as ticks on the product page and on pricing tables.
5. Under **Digital Delivery**, choose what subscribers get after every payment:
   - **Redirect URL** for a link: your WhatsApp or Telegram group, a private page or your app.
   - **File Download** for files.
6. Save.

### Share it

- **Its product page** in your store, like any product. It can go in funnels too.
- **Its subscribe link**: on the product, click **Subscribe link** to copy it. Send it on WhatsApp or put it in your bio.
- **On your website**: click **Embed** for a Subscribe button or a pricing table. See [Add a pricing table to your website](/help-center/add-a-pricing-table-to-your-website).

### How renewals work

Mobile money can't be charged automatically, so Paylead reminds subscribers by SMS and email:

- 3 days before the period ends,
- on the day it ends,
- and 2 days later, the last day of a 3-day grace period.

They tap the link and pay. If they don't renew within the grace period, the subscription ends. They can start it again any time.

Every payment is a normal order with the normal fee. It shows in **Orders** and adds to your balance.

### Changing the price

A new price only applies to new subscribers. People already subscribed keep the price they signed up at.

### Free trials

On the product, set **Free trial** to the number of free days, for example 7. New subscribers get access straight away and pay nothing until the trial ends. We remind them before it ends, and they pay only if they want to keep it. Each person gets one trial per subscription.

### Coupons

Your store's [discount codes](/help-center/create-discount-codes) work on subscriptions too. Subscribers tap **Have a coupon?** on the subscribe page, or you can add the code to your link: `paylead.app/subscribe/k3x9pa?coupon=SAVE20`.

A code takes money off the first payment. To keep the discount on every renewal, turn on **Keep it on every renewal** when you create the code.

### Related

- [Manage your subscribers](/help-center/manage-subscribers)

Source: https://paylead.app/help-center/sell-a-subscription · Updated 2026-10-12

---

## Sell bookings and coaching calls

> Let clients pick an open time and pay a deposit or the full fee, with a calendar invite.

1. Click **Create product** and choose **Bookings**.
2. Name the session and set the price.
3. Set the **session length** and your **available hours** for each day.
4. Choose how clients pay: the **full fee**, a **deposit**, or **in person**.
5. Click **Create product**.

### Fine-tuning your calendar

- **Buffers** before and after sessions, so calls never run back to back.
- **Minimum notice**, so nobody books you for ten minutes from now.
- **How far ahead** people can book.
- **Days off**, for holidays and busy days.
- **Location**: a video call, a phone call or a place, plus instructions.

### What clients get

They choose a time, pay, and get a confirmation with a calendar file. You see every booking in **Products → Bookings → Appointments**.

Source: https://paylead.app/help-center/sell-bookings-and-coaching-calls · Updated 2026-10-12

---

## Sell on your website with a Buy button

> Add a Buy button or a product card to WordPress, Wix, Webflow or any website. Buyers pay without leaving your page. Free on every plan.

### Get the code

1. Open a product (**Products**, then click it).
2. Click **Embed** at the top.
3. Pick **Buy button** or **Product card**.
4. Change the button text, colour and corners, and check the preview.
5. Copy the **HTML**.

You can also do this from **Settings → Developers → Embeds**.

### Paste it on your site

| Your site | Where to paste |
|---|---|
| WordPress | Add a **Custom HTML** block |
| Wix | **Add → Embed code → Embed HTML** |
| Webflow | Add an **Embed** element |
| Squarespace | Add a **Code** block |
| Shopify | Add a **Custom Liquid** section |
| Your own site | Anywhere in the page's HTML |

The code has two parts: a `<script>` line and the button or card. If you add several buttons to one page, the script only needs to be there once.

### What buyers see

The checkout opens over your page, with your product's options, upsells and coupons. Paying by card finishes there. Paying by mobile money opens the secure mobile money page, then shows their receipt.

### Site builders that block scripts

Some builders (Notion, Carrd's free plan) don't allow scripts. Use the **iframe** tab in the Embed dialog for product cards instead. Buttons in an iframe open the checkout in a new tab.

### Where embedded sales show

In **Orders**, like any sale. Open one and **Came from** says which website it was on.

Source: https://paylead.app/help-center/embed-a-buy-button-on-your-website · Updated 2026-10-12

---

## Send an invoice

> Send branded invoices with items, tax and due dates. Clients pay online by mobile money or card, in full or in parts.

Invoices are for custom work: a client who ordered 30 cakes, a business that hired you for a training, a wholesale buyer.

### Create an invoice

1. Click **Get paid** in the sidebar, open **Invoices** and click **New invoice**.
2. Pick an existing customer or add a new one (name, email, phone).
3. Add line items: description, quantity and price. For example "Branded T-shirts × 40 at GH₵ 85".
4. Optional: a **discount**, **tax**, a **due date** and a note.
5. Allow **part payments** if the client can pay a deposit first.
6. Click **Send**. The client gets it by email with a **Pay now** button, and you can share the link on WhatsApp too.

### What the client sees

A clean invoice with your logo and store name, the amount due and a pay button. They can download it as a PDF.

### Statuses

- **Draft**: not sent yet.
- **Sent**: waiting for payment.
- **Part paid**: a deposit came in; the balance is still open.
- **Paid**: settled in full.
- **Overdue**: past the due date and not paid.
- **Cancelled**: you cancelled it.

### Tips

- Set a due date. Overdue invoices are easy to spot in the list.
- Use part payments for big jobs: ask for 50% to start.
- Every payment shows as an order, so it lands in your wallet like any sale.

Source: https://paylead.app/help-center/send-an-invoice · Updated 2026-11-05

---

## Send email campaigns

> Write emails from ready-made templates, send to your contacts, and set up your own sending domain to reach the inbox.

Open **Messages**, click **New message** and choose **Email**. Emails are free to send.

### Write it

Write a subject line, then the email. Tap **Templates** to start from one: a launch, a flash sale, back in stock, a newsletter, a webinar invite, a free download, a review request, winning back old customers, Ghanaian holidays, or a plain personal note. **Insert personal detail** adds things like the customer's first name, and **AI Assistant** can write it for you.

### Choose who gets it

Send to all your contacts, to people who bought a product, or to emails you paste or upload in a CSV file. Then click **Send Broadcast**, or click **Send later** to pick a day and time and then **Schedule**. Paylead checks each campaign before it goes out, then sends it at your time.

### Your own sending domain

Emails go out from Paylead's shared address by default. Add your own domain under **Messages → Setup → Add domain** (you add a few DNS records once). **Any campaign to more than 300 contacts needs your own verified domain.** This protects your delivery and everyone else's.

### Limits per plan

| | Starter | Pro | Business |
|---|---|---|---|
| Email contacts | 150 | 10,000 | 50,000 |
| Marketing emails a month | 3,000 | 30,000 | 150,000 |
| A day | 500 | 5,000 | 20,000 |

Receipts and order emails are never counted.

### Stay out of spam

- Only email people who agreed to hear from you.
- Every campaign has a working unsubscribe link; don't hide it.
- Large first sends to imported lists go out gradually.

Source: https://paylead.app/help-center/email-campaigns-and-templates · Updated 2026-11-05

---

## Send SMS campaigns

> Text your customers about launches, restocks and offers, now or at a time you pick.

Open **Messages** and click **New message**, then choose **SMS**. Texts reach any phone, even without data.

### Send an SMS campaign

1. Give the campaign a name only you will see, like "Black Friday".
2. Write the message, or **Load a template**. Tap **First Name** or **Store Name** to add them, so each text feels personal. **AI Assistant** can write it for you.
3. Choose who gets it: your contacts, numbers you paste, or a CSV file.
4. Check the cost. Paylead shows how many messages it takes and your SMS balance after sending.
5. Click **Send Broadcast**. To send it later instead, click **Send later** beside it, pick a day and time, then click **Schedule**.

SMS campaigns need an approved Sender ID and SMS credits. See [SMS receipts and your Sender ID](/help-center/sms-receipts-and-sender-id).

### WhatsApp

WhatsApp broadcasts are not available yet. Until they are, share your product links on your WhatsApp status, or send a text or an email instead.

### Templates

Save messages you send often under **Messages → Templates**.

### Good practice

Message people who bought from you or signed up, keep it short, and always include the link to what you are talking about.

Want messages to go out on their own, like a thank-you after every order? See [Email automations](/help-center/email-automations).

Source: https://paylead.app/help-center/send-sms-and-whatsapp-campaigns · Updated 2026-11-05

---

## Set up a Meta custom conversion for your sales

> Count every sale, or one product's sales, with a custom conversion based on your Paylead receipt page. Every click, step by step.

Most sellers should simply optimise for the **Purchase** event, which Paylead sends automatically with the price. Use a custom conversion when you want a campaign to count **one product's** sales, or when you're used to setting ads up this way on another platform, like Selar.

Before you start, [connect your Meta pixel](/help-center/connect-meta-and-tiktok-pixels).

### Step 1: Copy your rule from Paylead

1. Open **Products** and tap the product.
2. Tap the green **megaphone** at the top (**Promote with Meta ads**).
3. On the **Track** step, tap **Using a custom conversion instead?**
4. Tap **Copy** next to the rule you want:
    - **Sales of this product**: `product=` followed by the product's code
    - **Every sale in your store**: `/receipt`

![The custom conversion rules in the Promote panel](/images/help/meta-ads/custom-conversion.webp)

### Step 2: Create the custom conversion in Meta

1. Go to **business.facebook.com/events_manager**.
2. In the left menu, click **Custom conversions**.
3. Click **Create custom conversion**.
4. **Name:** something you'll recognise, like "Side Hustle Playbook sale".
5. **Data source:** choose the pixel (dataset) you connected to Paylead.
6. **Conversion event:** choose **All URL traffic**.
7. **Rules:** choose **URL**, then **contains**, and paste the rule you copied.
8. Optional: add a value (your product's price), so Ads Manager can show what the ads earned.
9. Click **Create**.

### Step 3: Use it in your campaign

1. In Ads Manager, open your campaign's ad set.
2. Under **Conversion**, set **Conversion location** to **Website**.
3. Under **Conversion event**, choose your new custom conversion.

### Why this works on Paylead

Right after paying, buyers land on their receipt:

`yourstore.paylead.app/receipt/ORD-2026-AB12CD34?product=abc123`

- Every receipt address contains **/receipt**.
- Right after checkout it also contains **product=** and the product's code. A cart with several products has one `product=` for each.
- Emailed receipt links don't carry `product=`, so a buyer who comes back later to download again doesn't count as a second sale.

### If the product has its own thank-you page

If you set a thank-you page in the product's settings, buyers go there instead of the Paylead receipt. The **Track** step shows that page's address instead: use it with **URL contains**.

### Good to know

- A custom conversion only counts sales from the day you create it, so create it before you start the ads.
- Meta can take a little while to mark a new custom conversion as active.
- The **Purchase** event still gives the fullest numbers, because Paylead also sends it from our servers when mobile money payments are confirmed.

Source: https://paylead.app/help-center/set-up-a-meta-custom-conversion · Updated 2026-10-17

---

## Set up a webinar

> Run a live webinar or an evergreen one on a schedule, with reminders, replays and an offer on screen.

1. Click **Create product** and choose **Webinar**.
2. Add the title, cover image, description and price (it can be free).
3. In **Webinar**, choose the kind:
    - **Live**: set the date, time, time zone and length, and add your Zoom, Google Meet or YouTube Live link. A YouTube stream plays right in the room.
    - **Evergreen**: add your recording and the times and days it should play. Attendees pick a session.
4. Click **Create product**.

### What attendees get

Each attendee gets a private room link, a calendar invite (Google or any calendar), and email reminders a day, an hour, 30 minutes and 5 minutes before. Attendees who gave a phone number also get a text with the join link 15 minutes before the start. The text is free when Paylead sends it, or goes under your own Sender ID if you have one. The join link only appears shortly before the start.

### Replays

Turn on the replay and choose how many hours it stays available after the session.

### Show an offer in the room

Pick a product to offer, or add a link, and choose when it appears:

- **At the start**,
- **At a set minute**,
- **Near the end** (the last ten minutes).

Attendees can buy without leaving the room, with the same checkout as your store.

Source: https://paylead.app/help-center/set-up-a-webinar · Updated 2026-10-16

---

## Set up webhooks

> Send paid orders and subscription changes to your app, Zapier, Make or your own server the moment they happen.

Webhooks are on the **Pro** and **Business** plans.

1. Go to **Settings → Developers → Webhooks** and click **Add**.
2. Enter the address that should receive events. It must be a public `https://` address.
3. Tick the events you want, like **order.paid** or **subscription.expired**.
4. Click **Add endpoint**.
5. Click **Send test** and check the result under **Recent events**.

Each endpoint has a **signing secret**. Give it to your developer so their server can check that events really come from Paylead.

### If events fail

Paylead retries a failed event for about 10 hours. You can send any event again from **Recent events**. If 25 events in a row fail, the endpoint is switched off; fix it, then click **Edit** and tick **Send events to this endpoint**.

Developers: see [Webhooks](/developers/docs/webhooks) for the events and how to check signatures.

Source: https://paylead.app/help-center/set-up-webhooks · Updated 2026-10-12

---

## Set up your store

> Name your store, pick one of six looks, and add your logo and brand colour.

Your store is the page buyers see when they open your link. Setting it up takes a few minutes.

### Name, logo and colour

1. Open **Store Settings** in the sidebar.
2. On the **General** tab, add your store name, a short description and your logo.
3. Pick your brand colour. Buttons and highlights across your store and checkout use it.

### Pick a look

Your store can wear one of six looks: **Classic**, **Market**, **Boutique**, **Night**, **Studio** and **Editorial**. Choose one in **Store Settings**; your tip page uses the same look so everything feels like one brand.

Creators can also choose a layout made for them: **Link in bio**, **Profile**, **Coach** or **Course**.

### Your link

Every store gets a free link like `yourstore.paylead.app`. On the Business plan you can connect your own domain; see [Connect your own domain](/help-center/connect-your-own-domain).

### Checkout settings

On the **Payments** tab you decide how buyers pay: mobile money and cards are on by default, and you can turn on pay on delivery, a delivery fee, cart reminders and SMS receipts.

Source: https://paylead.app/help-center/set-up-your-store · Updated 2026-10-12

---

## Set up your tip page

> Let fans support you with any amount by mobile money or card.

Your tip page is ready the moment your store is.

1. Open **Store Settings** and find **Tip page** on the **General** tab.
2. Choose its look. It shares the six looks with your store.
3. Set the smallest amount someone can send, if you want one.
4. Save, then copy the tip page link.

Fans choose a suggested amount or type their own, add an optional message, and pay by mobile money or card. Each tip comes with a thank-you receipt, by SMS too when they leave a number.

Put the link in your bio, under your videos and at the end of your posts.

Source: https://paylead.app/help-center/set-up-your-tip-page · Updated 2026-10-12

---

## Setting Up Your Store

> Configure the foundational settings like your store name, currency, payout accounts, and team roles.

<p>Setting up your storefront foundation correctly ensures smooth payment processing and protects your backend workspaces as your team grows.</p>
<h2>Store Settings</h2>
<p>Access these parameters by navigating to <strong>Settings &gt; Store Settings</strong> in your left-hand menu:</p>
<ul>
<li><strong>Name Your Store</strong>: Set the customer-facing brand name.</li>
<li><strong>Set Your Currency</strong>: Set the default transactional currency.</li>
<li><strong>Support Contact Info</strong>: Define support email addresses and active phone lines.</li>
</ul>
<h2>Payout Accounts</h2>
<p>To withdraw funds collected through credit cards or mobile money:</p>
<ol>
<li>Navigate to <strong>Settings &gt; Payouts &amp; Billing</strong>.</li>
<li>Click <strong>Link Bank Account</strong>.</li>
<li>Select your region and enter your details.</li>
<li>Verify via your OTP (One-Time Password) confirmation email.</li>
</ol>
<h2>Team &amp; Roles</h2>
<p>Securely collaborate with support agents and shipping couriers:</p>
<ul>
<li><strong>Admin</strong>: Complete dashboard clearance.</li>
<li><strong>Support Agent</strong>: Read/write clearance for CRM records, customer notes, and active tasks.</li>
<li><strong>Fulfillment Manager</strong>: Visual clearance restricted to the Shipping Dashboard and Waybill generator.</li>
</ul>

Source: https://paylead.app/help-center/setting-up-your-store · Updated 2026-07-28

---

## Share your store link

> Put your store link in your bio, status and ads so buyers can order without messaging you.

Once your first product is live, share your link everywhere your buyers are.

### Where to find it

Your link is at the top of **Store Settings**, and on every product's page in **Products** (use the share button to copy a product's own link).

### Where to put it

- **Instagram and TikTok bio**: use the **Link in bio** layout so followers can buy, book or tip right on the page.
- **WhatsApp status and business profile**: post a product link with a photo.
- **Ads**: send people straight to a product or a sales page, and add your pixels first so you can see what sold ([Connect your pixels](/help-center/connect-meta-and-tiktok-pixels)).

### Tip

Link to the exact product you are talking about instead of your whole store. Fewer taps to pay means more people finish.

Source: https://paylead.app/help-center/share-your-store-link · Updated 2026-10-12

---

## Show your products on your website

> Put your whole store, or one category, on your own website as a grid with Buy buttons.

1. Go to **Settings → Developers → Embeds** and choose **Your store**.
2. Choose **Product grid**.
3. Pick **All products** or one category, and how many to show.
4. Set the button text, colour, theme and corners, then copy the HTML and paste it on your site.

Your featured products come first. Each card has the picture, price and the right button for that product: buy, book a time, enroll or subscribe. Buyers pay over your page without leaving.

New products appear in the grid as soon as you publish them. To show only some products, put them in a category and pick it in step 3.

Source: https://paylead.app/help-center/show-your-products-on-your-website · Updated 2026-10-12

---

## SMS receipts and your Sender ID

> Buyers get their receipt by SMS. Register a Sender ID to send under your own name.

### SMS receipts

When a buyer gives a phone number, they get a text the moment they pay, with their order number, the amount and a link to their receipt. Pay-on-delivery buyers are told what to pay the rider.

If you do not have a Sender ID of your own, Paylead sends receipts and cart reminders at **no cost to you**, signed with your store's name.

Turn receipt texts off in **Store Settings → Payments → Text buyers their receipt**.

### Your own Sender ID

A Sender ID is the name your texts come from, like `AdwoaKitch`.

1. Open **Messages**, then the **Setup** tab.
2. Request a Sender ID: 3 to 11 letters or numbers, no spaces.
3. Wait for approval.
4. Buy an SMS credit pack.

Once approved and topped up, receipts, reminders and campaigns go out under your name and use your credits.

### Campaigns

To text your customers about a launch or a restock, see [Send SMS campaigns](/help-center/send-sms-and-whatsapp-campaigns).

Source: https://paylead.app/help-center/sms-receipts-and-sender-id · Updated 2026-11-05

---

## The Dashboard & AI Center

> Understand your dashboard metrics and learn how to use the Magic AI Bar to automate tasks.

<p>When you log into Paylead, the first thing you see is your <strong>Dashboard</strong>. This is your command center for tracking revenue, managing team members, and interacting with Paylead's AI systems.</p>
<h2>The Dashboard</h2>
<p>The dashboard is split into three main components designed to give you instant clarity:</p>
<ul>
<li><strong>Top Stats</strong>: Real-time monitors for your Total Revenue, Total Orders, and Active Customers.</li>
<li><strong>Onboarding Progress</strong>: A dynamic checklist guiding new merchants through the setup phase.</li>
<li><strong>The Magic AI Bar</strong>: An interactive, natural language prompt bar.</li>
</ul>
<h2>The AI Center</h2>
<p>Paylead's AI Center houses advanced models trained specifically for e-commerce growth.</p>
<ul>
<li><strong>Generate Copy</strong>: Instantly draft product descriptions, landing page headlines, email templates, and ad creatives.</li>
<li><strong>Generate Images</strong>: Create high-resolution stock photography directly in your media library.</li>
<li><strong>Analytics Queries</strong>: Connect to your store's database securely using natural language.</li>
</ul>

Source: https://paylead.app/help-center/the-dashboard-ai-center · Updated 2026-07-28

---

## The Funnel Builder

> Guide your customers step-by-step from looking at the product to entering their credit card.

<p>Learn to build conversion-optimized funnels that direct incoming traffic straight to the checkout form, removing standard navigation distractions.</p>
<h2>Why Funnels?</h2>
<p>Traditional websites are menus. They ask users to browse catalogs, leading to decision paralysis. A sales funnel is a guided linear journey that answers objections step-by-step, ending at a checkout page.</p>
<h2>Funnel Structure</h2>
<ol>
<li><strong>Sales Page</strong>: Dynamic media layouts explaining features, handling objections, and showing social proof.</li>
<li><strong>Checkout Page</strong>: Optimized form collecting client data, shipping preferences, and payment details.</li>
<li><strong>One-Click Upsell</strong>: The core revenue generator. Once payment details are entered, show a secondary offer that can be purchased with a single click.</li>
<li><strong>Thank You Page</strong>: Detailed shipping details and post-purchase confirmation instructions.</li>
</ol>

Source: https://paylead.app/help-center/the-funnel-builder · Updated 2026-07-28

---

## Upsells and order bumps with the offer builder

> Add a one-tap extra at checkout and a one-click offer after payment. Choose which products trigger each offer, set a discount, and see what each one earns.

Offers raise how much each buyer spends without finding new buyers. Go to **Upsells** in your dashboard.

### Two kinds of offer

- **Order bump**: a small extra shown at checkout, added with one tap. Example: "Add the printable workbook for GH₵ 20".
- **Upsell**: a one-click offer shown right after payment. The buyer doesn't re-enter any details. Example: "Get the full video course for GH₵ 150 (normally GH₵ 250)".

### Create an offer

1. Click **New offer** and choose the type.
2. Pick the product you're offering. It must be a live product; services and bookings can't be one-click offers because they need a date or a brief.
3. Set the price: full price, **% off** or **amount off**.
4. Write the headline, a short description, up to a few bullet points and the button label.
5. Choose when it shows: on **all products** or only **selected products**.
6. Save. The offer is live straight away; use its switch to pause it.

You can also offer a quick **add-on** that isn't a product, such as gift wrapping or express delivery, with a link, text or file delivered after payment.

### Read the numbers

Each offer shows how many people **saw** it, how many **took** it and the **revenue** it brought in. Keep the ones that convert and change the ones that don't.

### Good offers

- Make it complementary: a recipe ebook + a meal-plan template.
- Keep bumps cheap (10–30% of the main price).
- Make upsells feel like a deal you only get now.

Source: https://paylead.app/help-center/set-up-upsells-with-the-offer-builder · Updated 2026-10-12

---

## Use a funnel template

> Start from one of six ready funnels and make it yours in minutes.

1. Open **Funnels** and click to create a new funnel.
2. Choose **Templates**. Previews show your store name and products.
3. Pick one:
    - **Spotlight**: a sales page for one product,
    - **Magnet**: a free guide in exchange for an email, with an offer,
    - **Live Room**: a webinar sign-up,
    - **Shopfront**: physical products with pay on delivery,
    - **Cohort**: a course launch,
    - **Strategy Call**: a coaching application.
4. On the setup screen, choose the product, your accent colour and, for Magnet, the guide link.
5. Optionally ask the AI to rewrite the words for your product while keeping the design.

Lead templates create their form for you and send people to a thank-you page after they sign up.

Edit anything afterwards; see [Edit your page](/help-center/edit-your-page).

Source: https://paylead.app/help-center/use-a-funnel-template · Updated 2026-10-12

---

## Your dashboard, explained

> A quick tour of your dashboard and the sidebar: products, orders, getting paid, customers, marketing, funnels and payouts.

### The home screen

- **Sales**: switch between **Today**, **7 days** and **This month** to see your sales, orders, average order and customers, compared with the period before.
- **Ready to withdraw**: money you can take out now. Add your mobile money or bank account once, and withdrawals arrive the next working day.
- **Your store link**: copy it, or share it straight to WhatsApp.
- **Needs your attention**: what to do next, like paid orders waiting to be sent.

### The sidebar

The sidebar on the left holds everything. Here is what each part is for.

- **Create product**, at the top: add something new to sell.
- **AI Center**: **Chat** with Paylead AI about your store, or ask it to build a funnel, create products and discount codes, or look up orders. **Copywriter** writes captions, ads and messages for you.
- **Products**: everything you sell. **All products**, **Upsells** (checkout add-ons and offers after payment), **Discounts & coupons** and **Affiliates**.
- **Orders**: every sale, with its payment and delivery status, plus **Abandoned carts**: people who started checkout but did not pay.
- **Get paid**: **Payment links**, **Invoices** and **Subscriptions**.
- **Customers**: every buyer and lead, with their orders.
- **Automations**: emails and texts that send on their own, like cart reminders and thank-you messages.
- **Messages**: email and SMS campaigns, message templates and your Sender ID.
- **Funnels**: sales pages and funnels, built with AI or from a template.
- **Forms & scorecards**: lead forms, scorecards and quiz funnels.
- **Payouts**: your balance, money on its way, withdrawals and expenses.
- **Store page**: how your store looks to buyers.
- **Store settings**: your store details, checkout and payments, upsells, pixels, domains and plan.

Your profile, billing, team, alerts and developer settings are under **My Account** at the bottom of the sidebar.

Source: https://paylead.app/help-center/your-dashboard-explained · Updated 2026-11-05

# Developer docs

## Introduction

> Take subscriptions and payments in your website or app through Paylead, without your own payment gateway.

Paylead lets you charge people by mobile money and card from your own website or app. You don't need a payment gateway account, a merchant account or a business registration with a processor: your Paylead store takes the payment, and the money lands in your Paylead wallet for payout to your MoMo or bank account.

There are three ways to connect, and you can mix them:

| | What it is | Who it's for |
|---|---|---|
| **Embeds** | A script tag that puts Buy buttons, product cards, pricing tables and pay boxes on any page | Anyone with a website. No backend needed |
| **Developer API** | A JSON API for your store: check who has access, list orders, create payment links and invoices, manage customers | Developers with a backend |
| **Webhooks** | Paylead calls your server the moment something happens: an order is paid, a subscription renews or ends | Developers who want real-time updates |

### What you can build

- **A paid app or micro-SaaS.** Add a Subscribe button, then check `GET /access?ref=USER_ID` when the user signs in.
- **A paid community or membership.** Sell a monthly subscription whose delivery is your WhatsApp or Telegram group link.
- **A shop on your own website.** Put Buy buttons or product cards on WordPress, Wix, Webflow or your own site.
- **Donations.** A pay box with amounts to tap, for churches, NGOs and creators.
- **Your own checkout flow.** Create one-off payment links or invoices from your backend and send people to them.

### How money moves

Every payment, whether it comes from an embed, a payment link or a subscription renewal, is a normal Paylead order. It shows in **Orders**, carries the normal fee, and adds to your wallet balance. Buyers get a receipt by email and SMS.

Mobile money can't be charged without the buyer, so subscriptions renew by reminder: Paylead texts and emails the subscriber before each renewal, and they pay with one tap. See [Subscriptions](/developers/docs/subscriptions).

### Plans

| | Starter (free) | Pro | Business |
|---|---|---|---|
| Embeds | ✓ | ✓ | ✓ |
| Remove "Payments by Paylead" from embeds | | ✓ | ✓ |
| Sell subscriptions | | ✓ | ✓ |
| Developer API and webhooks | | ✓ | ✓ |

### Base URL

All API requests go to:

```
https://paylead.app/api/v1
```

Requests and responses are JSON. Times are ISO 8601 with a time zone. Amounts are numbers in the store's currency (for example `50.00` for GH₵ 50).

### Next steps

1. Follow the [Quick start](/developers/docs/quick-start) to take your first subscription.
2. Read [Authentication](/developers/docs/authentication) to make your first API call.
3. Add a [Buy button](/developers/docs/buy-button-and-product-card) to your site.

Source: https://paylead.app/developers/docs/introduction

---

## Quick start

> Charge for your app every month in four steps. A Subscribe button, one API call, and optionally a webhook.

This guide takes you from nothing to a paying subscriber. It assumes your store is on the Pro or Business plan.

### 1. Create a subscription product

In your dashboard go to **Products → Add product → Subscription**.

- Give it a name, for example **Pro plan**.
- Set the price and how often it renews: every week, month, 3 months or year.
- Under **Digital Delivery**, choose **Redirect URL** and enter your app's URL, for example `https://myapp.com/welcome`. After paying, subscribers are sent there.

Save it. On the product page, the **Subscribe link** button copies the hosted subscribe page, which looks like:

```
https://paylead.app/subscribe/k3x9pa
```

`k3x9pa` is the product's code. You'll use it below.

### 2. Add a Subscribe button

The simplest button is a link. Pass the signed-in user's email and your own id for them as `ref`:

```html
<a href="https://paylead.app/subscribe/k3x9pa?email=ama@example.com&ref=USER_123">
  Upgrade to Pro
</a>
```

Or open the subscribe page over your app with the embed script, so the user never leaves:

```html
<script src="https://paylead.app/embed.js" async></script>

<button
  data-paylead-subscribe="k3x9pa"
  data-paylead-ref="USER_123"
  data-paylead-prefill-email="ama@example.com"
>
  Upgrade to Pro
</button>
```

The user pays with mobile money or card. When the payment is confirmed they're sent to your link with the subscription added to the address:

```
https://myapp.com/welcome?subscription=sub_8f2k1m0q9z&ref=USER_123&status=active
```

### 3. Check access from your server

Create a key in **Settings → Developers → API keys**. Keep it on your server only.

Then, when the user signs in (or once a day), ask Paylead whether they should be let in:

```bash
curl "https://paylead.app/api/v1/access?ref=USER_123" \
  -H "Authorization: Bearer sk_live_your_key"
```

```json
{
  "has_access": true,
  "status": "active",
  "access_ends_at": "2026-11-13T09:00:00+00:00",
  "subscription": {
    "id": "sub_8f2k1m0q9z",
    "ref": "USER_123",
    "status": "active",
    "current_period_end": "2026-11-10T09:00:00+00:00",
    "manage_url": "https://paylead.app/subscription/…"
  }
}
```

`has_access` is all most apps need. It stays `true` during the 3-day grace period while a subscriber renews.

```js
// Node.js
const response = await fetch(
  `https://paylead.app/api/v1/access?ref=${encodeURIComponent(user.id)}`,
  { headers: { Authorization: `Bearer ${process.env.PAYLEAD_KEY}` } },
);
const { has_access } = await response.json();
```

```php
// Laravel
$access = Http::withToken(config('services.paylead.key'))
    ->get('https://paylead.app/api/v1/access', ['ref' => $user->id])
    ->json();

$user->update(['is_pro' => $access['has_access']]);
```

### 4. Optional: get told when things change

Instead of checking on every sign-in, you can let Paylead tell you. Add an endpoint in **Settings → Developers → Webhooks**, and Paylead will POST events like `subscription.activated`, `subscription.renewed` and `subscription.expired` to it.

See [Webhooks](/developers/docs/webhooks) for the events and how to check the signature.

### Let users manage their subscription

Every subscription has a private page where the subscriber can renew early or cancel. Link to it from your app's settings using `subscription.manage_url`. Every reminder Paylead sends links there too.

Source: https://paylead.app/developers/docs/quick-start

---

## Authentication, errors and limits

> API keys, error responses, rate limits and pagination.

### API keys

Every request carries one of your store's secret keys:

```bash
curl https://paylead.app/api/v1/store \
  -H "Authorization: Bearer sk_live_your_key"
```

- Create keys in **Settings → Developers → API keys**. Only the store owner can.
- Each key works for **one store**. If you have several stores, each has its own keys.
- The full key is shown **once**, when you create it. Paylead keeps only a fingerprint of it, so a lost key is replaced, not recovered.
- Keep keys on your server. Anyone with a key can read your orders and customers. Never put one in website code, a mobile app or a public repository.
- Make one key per app, so you can delete one without breaking the others. A store can have up to 10.
- **Test keys** start with `sk_test_` and only see test-mode subscriptions. See [Test mode](/developers/docs/test-mode).

`GET /store` is a quick way to check a key works: it returns the store the key belongs to.

### Errors

Paylead uses normal HTTP status codes. Error bodies are JSON with a `message` for people and, for authentication errors, an `error` code for your code.

| Status | `error` | What it means |
|---|---|---|
| 401 | `missing_api_key` | No `Authorization: Bearer` header |
| 401 | `invalid_api_key` | The key is wrong or was deleted |
| 402 | `plan_required` | The store's plan doesn't include the API. Upgrade to Pro |
| 403 | `store_suspended` | The store is suspended, so its API is off |
| 403 | `developer_access_blocked` | Paylead turned off developer access for this store. Contact support |
| 403 | `live_key_required` | A test key called an endpoint that only works with live keys |
| 404 | | The thing doesn't exist, or belongs to another store |
| 422 | | Validation failed. `errors` lists each field's problems |
| 429 | | Too many requests. Wait a minute |

A validation error looks like this:

```json
{
  "message": "The title field is required.",
  "errors": {
    "title": ["The title field is required."]
  }
}
```

Some actions return a 422 with an `error` code when the request is valid but can't be done, for example cancelling a paid invoice (`invoice_paid`).

### Rate limits

Each key can make **120 requests a minute**. Past that you get a `429`. If you check access on every page load, cache the answer for a few minutes, or use [webhooks](/developers/docs/webhooks) instead.

### Pagination

List endpoints return 25 items a page. Use `?page=2` for more, and `?per_page=` to choose up to 100.

```json
{
  "data": [ … ],
  "links": {
    "first": "https://paylead.app/api/v1/orders?page=1",
    "last": "https://paylead.app/api/v1/orders?page=8",
    "prev": null,
    "next": "https://paylead.app/api/v1/orders?page=2"
  },
  "meta": {
    "current_page": 1,
    "last_page": 8,
    "per_page": 25,
    "total": 187
  }
}
```

Lists are newest first. Single objects come back inside `data`:

```json
{ "data": { "id": 42, "object": "order", … } }
```

The access check is the one exception: it returns its answer at the top level, so `has_access` is easy to read.

Source: https://paylead.app/developers/docs/authentication

---

## Test mode

> Build and test your integration with fake users and simulated payments. No real money moves and nobody is texted or emailed.

Test mode lets you run the whole subscription flow, from subscribe to renew, lapse and expire, before you go live. You don't need real money or real users.

### 1. Make a test key

In **Settings → Developers → API keys**, choose **Test** and create a key. Test keys start with `sk_test_`:

```bash
curl https://paylead.app/api/v1/access?ref=USER_42 \
  -H "Authorization: Bearer sk_test_your_key"
```

Making a test key also turns on test mode for your store's subscribe pages.

### 2. Add a test webhook endpoint

In **Webhooks**, add an endpoint and choose **Test**. Test endpoints only get test-mode events, and live endpoints never do, so a fake user can't reach your production app.

Every event carries `livemode`:

```json
{
  "id": "evt_…",
  "type": "subscription.activated",
  "livemode": false,
  "data": { "object": "subscription", "livemode": false, "status": "active" }
}
```

### 3. Subscribe a test user

Open your subscribe page with `?test=1`:

```
https://paylead.app/subscribe/k3x9pa?test=1&ref=USER_42&email=dev@example.com
```

Or add `data-paylead-test` to your Subscribe button or pricing table:

```html
<button data-paylead-subscribe="k3x9pa" data-paylead-ref="USER_42" data-paylead-test>
  Subscribe
</button>
```

From code: `Paylead.subscribe('k3x9pa', { ref: 'USER_42', test: true })`.

Instead of the payment page, you get Paylead's test payment page. Choose **Payment succeeds** or **Payment fails**. A success starts the subscription and fires `subscription.activated` to your test endpoints. Then the user lands where a real subscriber would: your app's return URL, or their subscription page.

### 4. Fast-forward time

In **Settings → Developers → Test mode**, each test subscription has buttons to:

| Button | What happens | Event |
|---|---|---|
| Renew now | A simulated payment adds a period | `subscription.renewed` |
| End the period | The paid period runs out; the 3-day grace period starts | `subscription.past_due` |
| End grace period | Access ends | `subscription.expired` |
| Cancel | It stops renewing and runs to the end of the period | `subscription.cancelled` |

**Delete test data** removes every test subscription so you can start again.

### What test keys can do

| Endpoint | Test key |
|---|---|
| `GET /store`, `GET /products` | Yes, your real store and products |
| `GET /access`, `/subscriptions` | Yes, test subscriptions only |
| `POST /subscriptions/{id}/cancel` | Yes, test subscriptions only |
| Orders, customers, payment links, invoices | No: `403` with `live_key_required` |

Live keys never see test subscriptions.

### What test mode never does

- It never creates an order or touches your wallet, fees or Paylead Credit.
- It never texts or emails your test users.
- It never shows in your sales, subscribers list or monthly revenue.

### Going live

Swap your `sk_test_` key for a `sk_live_` key. Point your app's live webhook endpoint at production, and remove `?test=1` or `data-paylead-test`. Nothing else changes.

Source: https://paylead.app/developers/docs/test-mode

---

## How subscriptions work

> Statuses, renewals by reminder, the grace period, cancelling, and the pages your subscribers see.

A subscription is a buyer paying for one of your subscription products every week, month, 3 months or year.

### Renewals by reminder

Mobile money can't be charged without the buyer approving each payment, so Paylead doesn't charge anyone automatically. Instead it reminds them, and they pay in one tap:

| When | What the subscriber gets |
|---|---|
| 3 days before the period ends | Email and SMS: "renews on 13 Nov, renew here" |
| The day it ends | Email and SMS: "due today" |
| 2 days later | Email and SMS: "last day to renew" |
| 3 days after it ended | It expires. Email: "your subscription has ended" |

Reminders go out once a day in the morning. Texts are on Paylead, not your SMS credits.

Every payment, the first one and every renewal, is a normal order with the normal fee. It shows in your **Orders**, adds to your wallet, and the subscriber gets a receipt.

### Statuses

| Status | Meaning | `has_access` |
|---|---|---|
| `incomplete` | Checkout started, never paid. Not shown in lists | no |
| `active` | Paid up | yes |
| `past_due` | The period ended. In the 3-day grace period | yes |
| `cancelled` | They cancelled and the paid period ran out | no |
| `expired` | Not renewed in time | no |

A cancelled subscription keeps `status: active` until the end of the period they paid for, with `cancelled_at` set. It won't renew, and no more reminders go out.

### Paying early, paying late

- **Early:** paying before the period ends adds a full period after the current end date. Nobody loses days.
- **During grace:** the new period starts from the old end date, so the grace days count as used.
- **After it expired:** the new period starts the day they pay.

### Prices

A subscriber keeps the price they signed up at. If you change the product's price later, only new subscribers pay the new one.

### Free trials

Set **Free trial** days on the product (up to 90). A new subscriber gets access straight away and pays nothing until the trial ends:

- You get `subscription.trial_started`, with `on_trial: true`, `trial_ends_at` and `has_access: true`. `GET /access` says yes during the trial.
- Reminders go out before the trial ends, and the 3-day grace period follows it as usual.
- Their first payment fires `subscription.activated`. Paying before the trial ends doesn't cut it short: the first paid period starts when the trial ends.
- One trial per user per plan, matched on your `ref`, or on email when there's no ref.

### Coupons

Subscribers can enter a store coupon on the subscribe page, or you can pass one in the link: `/subscribe/k3x9pa?coupon=SAVE20`. A coupon takes money off the **first payment**, or off **every payment** when the seller turns on *Keep it on every renewal*. With a trial, it applies to the first payment after the trial.

The subscription shows `coupon` and `next_payment_amount`, the amount the next payment will cost. A 100% coupon starts the period with nothing to pay. Affiliate codes can't be used on subscriptions.

### Matching subscriptions to your users

Pass your own id for the user as `ref` when they subscribe. Paylead stores it on the subscription and sends it back everywhere: on the return to your app, in the API and in webhooks.

```
https://paylead.app/subscribe/k3x9pa?ref=USER_123&email=ama@example.com
```

If someone opens the subscribe page with a `ref` that already has an active subscription, they're taken to their manage page instead of paying twice.

Without a `ref`, Paylead matches subscribers by email.

### The pages your subscribers see

**The subscribe page**, `/subscribe/{code}`, asks for their name, email and phone, then takes the payment. You can fill these in with `?name=`, `?email=` and `?phone=`.

**The return.** After paying, they're sent to the product's after-purchase link with `?subscription=`, `?ref=` and `?status=` added. With no link set, they see a confirmation page.

**The manage page**, `/subscription/{token}`, shows when it renews and their payments, and lets them renew or cancel. Every email and text links to it. In the API it's `manage_url`.

### Selling subscriptions in your store

A subscription product also has a normal product page in your store, and can go in funnels like any product. Buying it there starts a subscription too, without a `ref`.

### Cancelling for a subscriber

From your dashboard (**Get paid → Subscriptions → the subscriber → Cancel**) or the API:

```bash
curl -X POST https://paylead.app/api/v1/subscriptions/sub_8f2k1m0q9z/cancel \
  -H "Authorization: Bearer sk_live_your_key"
```

They keep access until the end of the paid period. If they're already in the grace period, access ends straight away.

Source: https://paylead.app/developers/docs/subscriptions

---

## Checking access

> One call that answers "should this user be let in?

```
GET /api/v1/access
```

| Parameter | |
|---|---|
| `ref` | Your id for the user, as passed to the subscribe page. Use this or `email` |
| `email` | The subscriber's email, when you don't use refs |
| `product_id` | Only look at one product's subscriptions. Leave it out to accept any of your plans |

```bash
curl "https://paylead.app/api/v1/access?ref=USER_123" \
  -H "Authorization: Bearer sk_live_your_key"
```

### The answer

```json
{
  "has_access": true,
  "status": "past_due",
  "access_ends_at": "2026-11-13T09:00:00+00:00",
  "subscription": {
    "id": "sub_8f2k1m0q9z",
    "object": "subscription",
    "status": "past_due",
    "has_access": true,
    "ref": "USER_123",
    "product": { "id": 31, "name": "Pro plan" },
    "amount": 50,
    "currency": "GHS",
    "interval": "month",
    "current_period_end": "2026-11-10T09:00:00+00:00",
    "access_ends_at": "2026-11-13T09:00:00+00:00",
    "manage_url": "https://paylead.app/subscription/…"
  }
}
```

| Field | |
|---|---|
| `has_access` | `true` if any of the user's subscriptions is paid up or in its grace period |
| `status` | The status of the subscription shown, or `null` if they never subscribed |
| `access_ends_at` | When access stops if they don't renew |
| `subscription` | The subscription giving access, or their latest one, or `null` |

Someone who never subscribed gets `has_access: false` and `subscription: null`, not an error.

If a user has several subscriptions (for example to two plans), `has_access` is `true` when any of them gives access, and `subscription` is the one that lasts longest.

### Tips

- **Show a renew banner** when `status` is `past_due`: link it to `subscription.manage_url`.
- **Cache it.** Access only changes when someone pays, a period ends or they cancel. Checking on sign-in, or caching for a few minutes, is plenty. You can make 120 requests a minute per key.
- **Or skip polling** and keep your own copy up to date with [webhooks](/developers/docs/webhooks).

Source: https://paylead.app/developers/docs/access-check

---

## Embeds overview

> One script puts Buy buttons, product cards, booking calendars, courses, webinars, product grids, newsletter boxes, tip buttons, pricing tables, pay boxes and forms on any website. Free on every plan.

Add the script once per page, then add elements with `data-paylead-*` attributes where you want them.

```html
<script src="https://paylead.app/embed.js" async></script>
```

| Embed | Element | Shows |
|---|---|---|
| [Buy button](/developers/docs/buy-button-and-product-card) | `<button data-paylead-buy="CODE">` | Your own button. Opens checkout over the page |
| [Product card](/developers/docs/buy-button-and-product-card) | `<div data-paylead-product="CODE">` | Picture, name, price and Buy |
| [Booking calendar](/developers/docs/booking-calendar) | `<div data-paylead-booking="CODE">` | Days and times to pick, then pay |
| [Course card](/developers/docs/course-and-webinar) | `<div data-paylead-course="CODE">` | The course, its lessons and Enroll |
| [Webinar sign-up](/developers/docs/course-and-webinar) | `<div data-paylead-webinar="CODE">` | Next session, a countdown and Register |
| [Product grid](/developers/docs/store-newsletter-and-tips) | `<div data-paylead-store="STORE">` | Your products, or one category, in a grid |
| [Newsletter box](/developers/docs/store-newsletter-and-tips) | `<div data-paylead-newsletter="STORE">` | Email sign-up into your customer list |
| [Tip button](/developers/docs/store-newsletter-and-tips) | `<div data-paylead-tip-button="STORE">` | A floating Support me button |
| [Subscribe button](/developers/docs/subscribe-button-and-pricing-table) | `<button data-paylead-subscribe="CODE">` | Your own button. Opens the subscribe page over the page |
| [Pricing table](/developers/docs/subscribe-button-and-pricing-table) | `<div data-paylead-pricing="A,B,C">` | Your plans side by side |
| [Pay button](/developers/docs/pay-and-donate) | `<button data-paylead-pay="SLUG">` | Opens a payment link over the page |
| [Pay box](/developers/docs/pay-and-donate) | `<div data-paylead-pay-inline="SLUG">` | A payment form in the page, with amounts to tap |
| Form | `<div data-paylead-form="CODE">` | A form or scorecard. Get the code from **Forms → Share** |

On WordPress, use the [Paylead plugin](/developers/docs/wordpress) instead: every embed is a shortcode.

The quickest way to get the code is the **Embed** button on any product or payment link in your dashboard, or **Settings → Developers → Embeds**. It lets you style the embed, preview it and copy HTML, iframe or React code.

### Where the codes come from

- **Product and plan codes** are the short code at the end of the product's link, for example `k3x9pa` in `paylead.app/k3x9pa`. The Embed dialog fills them in for you.
- **Store addresses** are the end of your store link, for example `amas-studio` in `paylead.app/s/amas-studio`. Product grids, newsletter boxes and tip buttons use them.
- **Payment link slugs** are the end of the link, for example `church-giving` in `paylead.app/pay/church-giving`.

### Styling

Your own buttons keep your site's look; the checkout opens in your store's colours. Cards, tables and pay boxes take these attributes:

| Attribute | Values |
|---|---|
| `data-paylead-accent` | A colour like `#0b2c2e`, used for buttons and highlights |
| `data-paylead-scheme` | `light` (default), `dark`, or `auto` to follow the visitor's device |
| `data-paylead-radius` | `none`, `small`, `medium` (default), `large` or `full` |
| `data-paylead-button-text` | The button's words, for example `Get it now` |
| `data-paylead-layout` | Product cards only: `card` (default), `row` or `minimal` |

### What buyers see

The checkout opens over your page, full screen on phones. Buyers pay with mobile money or card without leaving your site. Paying by card stays in the overlay. Paying by mobile money opens the secure mobile money page in the same tab, then shows their receipt.

Every embedded sale is a normal order. In **Orders** it's marked as coming from an embed, with the website it was on.

### Where embeds work

Anywhere you can add HTML: WordPress (a Custom HTML block), Wix (Embed code), Webflow (Embed element), Squarespace (Code block), Shopify (Custom Liquid), Framer, Carrd, and your own site or app.

Site builders that don't allow scripts can still show cards, tables and pay boxes as a plain iframe. The Embed dialog's **iframe** tab gives you the code:

```html
<iframe
  src="https://paylead.app/embed/product/k3x9pa?layout=card"
  style="width:100%;max-width:420px;height:560px;border:0"
  loading="lazy"
></iframe>
```

Without the script, buttons inside an iframe open Paylead in a new tab instead of an overlay.

### Keep embeds on your own websites

By default, anyone can embed your products. To stop others from showing your checkout on their sites, list your own websites in **Settings → Developers → Embeds → Where your embeds can appear**:

```
mysite.com
www.mysite.com
*.myapp.io
```

Browsers then refuse to show your embeds anywhere else.

### Paylead branding

Cards, tables and the checkout show a small "Payments by Paylead" line. On Pro and Business it goes away when you turn off Paylead branding in **Store settings**.

### Next

- [JavaScript API and events](/developers/docs/javascript-api): open embeds from your own code and react when someone pays.

Source: https://paylead.app/developers/docs/embeds

---

## Buy button and product card

> Sell any product from your own site. Downloads, courses, webinars, physical goods, bookings and services.

### Buy button

Turn any button or link on your site into a Buy button:

```html
<script src="https://paylead.app/embed.js" async></script>

<button data-paylead-buy="k3x9pa">Buy the ebook · GH₵ 50</button>
```

Clicking it opens the product's checkout over your page, with everything your product page has: options and sizes, booking times, service packages, order bumps, coupons and pay-on-delivery if you offer it.

Products with nothing to choose (no options, time slot or package) go straight to the checkout form. The others show the product first so the buyer can pick.

It works for every kind of product. For subscriptions, use the [Subscribe button](/developers/docs/subscribe-button-and-pricing-table) instead, so you can pass your user's id.

### Product card

Show the product in your page, with its picture, name, price, rating and a Buy button:

```html
<div data-paylead-product="k3x9pa"></div>
```

Three layouts:

```html
<!-- A card with the picture on top (default) -->
<div data-paylead-product="k3x9pa"></div>

<!-- A row: small picture, name and price, button on the right -->
<div data-paylead-product="k3x9pa" data-paylead-layout="row"></div>

<!-- Just a button with the price: "Buy now · GH₵ 50" -->
<div data-paylead-product="k3x9pa" data-paylead-layout="minimal"></div>
```

Style it with `data-paylead-accent`, `-scheme`, `-radius` and `-button-text` (see [Styling](/developers/docs/embeds#styling)). The card grows to fit its content, so you don't need to set a height.

The card shows the product's sale price when it has one, with the full price crossed out, and the price in the visitor's currency when you set prices per country.

### A row of products

Put several cards in a grid with your own CSS:

```html
<div style="display:grid;grid-template-columns:repeat(auto-fill,minmax(260px,1fr));gap:16px">
  <div data-paylead-product="k3x9pa"></div>
  <div data-paylead-product="m7q2ze"></div>
  <div data-paylead-product="p0w8rt"></div>
</div>
```

### From your own code

```js
Paylead.buy('k3x9pa');

Paylead.product('#featured', 'k3x9pa', { layout: 'row' });
```

See [JavaScript API and events](/developers/docs/javascript-api).

Source: https://paylead.app/developers/docs/buy-button-and-product-card

---

## Booking calendar

> Let clients pick a day and time on your own site, then pay with mobile money or card. Like Calendly, with MoMo built in.

Put your booking product's calendar straight into your page:

```html
<script src="https://paylead.app/embed.js" async></script>

<div data-paylead-booking="k3x9pa"></div>
```

The client picks a day, then a time, and taps **Book now**. The checkout opens over your page with that time already in the cart, so all they do is enter their details and pay.

It uses everything you set on the booking product: your weekly hours, days off, buffer times, how much notice you need, how far ahead people can book, and whether they pay in full, pay a deposit or pay in person. Times show in the client's own timezone.

A time is held while the client pays. If someone else takes it first, the client is asked to pick another one.

### Styling

The calendar takes the same attributes as product cards (see [Styling](/developers/docs/embeds#styling)):

```html
<div
  data-paylead-booking="k3x9pa"
  data-paylead-accent="#0b2c2e"
  data-paylead-radius="large"
  data-paylead-button-text="Book my session"
></div>
```

The accent colour is used for the chosen day and time and for the button. The calendar grows to fit, so you don't need to set a height.

### Without the script

On site builders that block scripts, use an iframe:

```html
<iframe
  src="https://paylead.app/embed/book/k3x9pa"
  style="width:100%;max-width:420px;height:680px;border:0"
  loading="lazy"
  title="Book a time"
></iframe>
```

In a plain iframe, **Book now** opens your product page in a new tab with the time already picked.

### From your own code

```js
Paylead.booking('#calendar', 'k3x9pa', { theme: { accent: '#0b2c2e' } });

Paylead.on('paid', (detail) => {
  console.log('Booked and paid', detail.order_number);
});
```

### Other ways to sell bookings

A [Buy button](/developers/docs/buy-button-and-product-card) with a booking product's code opens the product page over your site, and the client picks the time there. Use it when you'd rather keep the calendar off your page.

Source: https://paylead.app/developers/docs/booking-calendar

---

## Subscribe button and pricing table

> Let people subscribe from your site or app, and show your plans side by side.

### Subscribe button

```html
<script src="https://paylead.app/embed.js" async></script>

<button
  data-paylead-subscribe="k3x9pa"
  data-paylead-ref="USER_123"
  data-paylead-prefill-email="ama@example.com"
  data-paylead-prefill-name="Ama Mensah"
>
  Upgrade to Pro
</button>
```

| Attribute | |
|---|---|
| `data-paylead-subscribe` | The subscription product's code |
| `data-paylead-ref` | Your own id for the signed-in user. It comes back on the subscription so you can [check access](/developers/docs/access-check) |
| `data-paylead-prefill-email` | Fills in their email |
| `data-paylead-prefill-name` | Fills in their name |
| `data-paylead-prefill-phone` | Fills in their phone number |
| `data-paylead-test` | [Test mode](/developers/docs/test-mode): a simulated payment, no real money. Needs a test key |

The subscribe page opens over your page. After the payment is confirmed, Paylead sends the subscriber to the product's after-purchase link with `?subscription=`, `?ref=` and `?status=active` added. Set that link to a page in your app that refreshes the user's access.

If the `ref` already has an active subscription, the overlay shows "You're already subscribed" with a link to their manage page instead of taking a second payment.

### Pricing table

Show two to four plans side by side, each with a Subscribe button:

```html
<div
  data-paylead-pricing="b4s1c0,pr0p1n,t3am99"
  data-paylead-featured="pr0p1n"
  data-paylead-ref="USER_123"
  data-paylead-prefill-email="ama@example.com"
></div>
```

- Plans appear in the order you list them. Only active subscription products from one store are shown.
- `data-paylead-featured` highlights one plan with a "Most popular" badge.
- Each plan lists **What subscribers get** from the subscription product as ticks.
- The button says **Subscribe**, or the product's button text if you set one. Change every button with `data-paylead-button-text`.
- The ref and prefill attributes are passed on to whichever plan the visitor picks.

Style it with `data-paylead-accent`, `-scheme` and `-radius`.

### From your own code

Single-page apps often have the user's details in code, not in HTML:

```js
Paylead.subscribe('k3x9pa', {
  ref: user.id,
  prefill: { email: user.email, name: user.name },
  onPaid: () => refreshAccess(),
});

Paylead.pricing('#plans', ['b4s1c0', 'pr0p1n', 't3am99'], {
  featured: 'pr0p1n',
  ref: user.id,
  prefill: { email: user.email },
});
```

With mobile money, the subscriber leaves your page to approve the payment and then lands on your after-purchase link, so `onPaid` only fires for card payments that finish in the overlay. Use the return to your link, the [access check](/developers/docs/access-check) or [webhooks](/developers/docs/webhooks) as the source of truth.

Source: https://paylead.app/developers/docs/subscribe-button-and-pricing-table

---

## Pay and donate

> Take any amount from your site with a payment link. Deposits, custom orders, church giving and donations.

Create a payment link in **Get paid → Payment links** (or with the [API](/developers/docs/api-reference#payment-links)). Its slug is the end of its link: `church-giving` in `paylead.app/pay/church-giving`.

### Pay button

```html
<script src="https://paylead.app/embed.js" async></script>

<button data-paylead-pay="church-giving">Give online</button>
```

The payment page opens over your site. It asks for what the link asks for: name, phone, email if you require it, and your question if you added one.

### Pay box

Put the payment form inside your page instead:

```html
<div data-paylead-pay-inline="church-giving"></div>
```

For links where the payer types the amount, offer amounts to tap:

```html
<div
  data-paylead-pay-inline="church-giving"
  data-paylead-amounts="20,50,100,200"
  data-paylead-accent="#7c3aed"
></div>
```

The payer taps an amount or types their own. The link's lowest amount still applies.

### Charges

If your store passes payment charges on to the buyer, the box shows the amount, the charges and the total before they pay. Otherwise they pay exactly the amount.

### From your own code

```js
Paylead.pay('church-giving');

Paylead.payInline('#give', 'church-giving', { amounts: [20, 50, 100] });
```

### One payment per customer

For a one-off amount owed by one person (a deposit, a custom order), create a link with the API with `is_reusable: false` and a `redirect_url` back to your site, then open it with `Paylead.pay(slug)` or send the person its `url`. See [Payment links](/developers/docs/api-reference#payment-links).

Source: https://paylead.app/developers/docs/pay-and-donate

---

## Course card and webinar sign-up

> Show a course with its lessons, or a webinar with a countdown, on your own site. Buyers enroll or register without leaving.

### Course card

```html
<script src="https://paylead.app/embed.js" async></script>

<div data-paylead-course="k3x9pa"></div>
```

The card shows the course's cover, name, price, how many lessons and hours it has, and the outline section by section. The first section is open; visitors can open the others. **Enroll now** opens the checkout over your page.

The outline comes from the course's lessons, so it stays up to date when you add or rename lessons.

### Webinar sign-up

```html
<div data-paylead-webinar="w8b2nd"></div>
```

For a live webinar it shows the date and time in the visitor's own timezone and counts down to it. For an evergreen webinar it shows the next session and says they can pick another after registering. **Register** opens the checkout, and free webinars go straight to the sign-up form.

### Styling

Both take the usual attributes (see [Styling](/developers/docs/embeds#styling)):

```html
<div
  data-paylead-webinar="w8b2nd"
  data-paylead-accent="#0b2c2e"
  data-paylead-scheme="dark"
  data-paylead-button-text="Save my seat"
></div>
```

### Without the script

```html
<iframe src="https://paylead.app/embed/course/k3x9pa" style="width:100%;max-width:420px;height:640px;border:0" loading="lazy" title="Course"></iframe>

<iframe src="https://paylead.app/embed/webinar/w8b2nd" style="width:100%;max-width:420px;height:440px;border:0" loading="lazy" title="Webinar"></iframe>
```

In a plain iframe the button opens the product page in a new tab.

### From your own code

```js
Paylead.course('#course', 'k3x9pa');
Paylead.webinar('#webinar', 'w8b2nd', { theme: { scheme: 'dark' } });
```

Source: https://paylead.app/developers/docs/course-and-webinar

---

## Product grid, newsletter and tips

> Show your whole store or one category, collect emails for your customer list, and add a floating Support me button.

These embeds use your **store's address** (the part after `paylead.app/s/`), not a product code. The Embed tab under **Settings → Developers** fills it in for you.

### Product grid

```html
<script src="https://paylead.app/embed.js" async></script>

<div data-paylead-store="amas-studio"></div>
```

Your active products as a grid, featured ones first, each with its price and button. Buttons open the right thing for the product: the checkout, the booking times, or the subscribe page.

| Attribute | |
|---|---|
| `data-paylead-category` | Only one category, by its slug, for example `courses` |
| `data-paylead-limit` | How many products, 1 to 24 (12 by default) |

Two columns on phones, more on wider screens.

### Newsletter box

```html
<div
  data-paylead-newsletter="amas-studio"
  data-paylead-heading="Get my weekly creator tips"
></div>
```

Visitors leave their email and get a confirmation email. Once they click it, they're in your **Customers** list with marketing consent, ready for your email campaigns. Nobody is added without confirming.

| Attribute | |
|---|---|
| `data-paylead-heading` | The heading. Defaults to your store form's heading, or "Get updates from your store" |
| `data-paylead-body` | A line under the heading |
| `data-paylead-ask-name` | Add this to ask for their name too |

### Tip button

A floating **Support me** button in the bottom corner of every page:

```html
<div data-paylead-tip-button="amas-studio"></div>
```

It opens your tip page over the site. Turn the tip page on first in **Store Settings → General → Tip page**.

| Attribute | |
|---|---|
| `data-paylead-button-text` | The button's words, "Support me" by default |
| `data-paylead-accent` | The button's colour |
| `data-paylead-position` | `left` for the bottom-left corner |

To use your own button instead of the floating one:

```html
<button data-paylead-tip="amas-studio">Buy me a coffee</button>
```

### From your own code

```js
Paylead.store('#shop', 'amas-studio', { category: 'courses', limit: 6 });
Paylead.newsletter('#signup', 'amas-studio', { heading: 'Join 2,000 readers', askName: true });
Paylead.tipButton('amas-studio', { buttonText: 'Tip me', position: 'left' });
Paylead.tip('amas-studio'); // open the tip page now
```

A paid tip fires the `paid` event with `kind: 'tip'`.

Source: https://paylead.app/developers/docs/store-newsletter-and-tips

---

## WordPress plugin

> Every Paylead embed as a WordPress shortcode. No code to copy, and Paylead only loads on pages that use it.

### Install it

1. Download the plugin: [paylead.zip](/integrations/wordpress/paylead.zip). It's also in **Settings → Developers → Embeds**.
2. In WordPress go to **Plugins → Add New Plugin → Upload Plugin**, choose the zip and click **Install Now**, then **Activate**.
3. Go to **Settings → Paylead** and enter your store address: the end of your store link, for example `amas-studio` in `paylead.app/s/amas-studio`. You can paste the whole link.

Then add a shortcode to any page, post or **Shortcode** block. The **WordPress** tab in any Embed window in Paylead writes the shortcode for you.

### Shortcodes

| Embed | Shortcode |
|---|---|
| Buy button | `[paylead_buy code="k3x9pa"]Buy the ebook[/paylead_buy]` |
| Product card | `[paylead_product code="k3x9pa" layout="row"]` |
| Booking calendar | `[paylead_booking code="k3x9pa"]` |
| Course card | `[paylead_course code="k3x9pa"]` |
| Webinar sign-up | `[paylead_webinar code="w8b2nd"]` |
| Subscribe button | `[paylead_subscribe code="k3x9pa" ref="user"]Join[/paylead_subscribe]` |
| Pricing table | `[paylead_pricing plans="basic1,pro22" featured="pro22"]` |
| Pay or donate button | `[paylead_pay link="church-giving"]Give[/paylead_pay]` |
| Pay or donate box | `[paylead_pay_box link="church-giving" amounts="20,50,100"]` |
| Product grid | `[paylead_store category="courses" limit="6"]` |
| Newsletter box | `[paylead_newsletter heading="Get my weekly tips" ask_name]` |
| Tip button | `[paylead_tip floating="yes"]`, or `[paylead_tip]Buy me a coffee[/paylead_tip]` |
| Form or scorecard | `[paylead_form code="AbC123"]`, with `mode="popup"` or `mode="slide-in"` |

The product grid, newsletter and tip shortcodes use the store from **Settings → Paylead**. Add `store="…"` to use another.

### Options

Every shortcode takes the same options as the [embed attributes](/developers/docs/embeds#styling), written with underscores:

| Option | |
|---|---|
| `accent` | A colour like `#0b2c2e`. Defaults to the colour in Settings → Paylead |
| `scheme` | `light`, `dark` or `auto` |
| `radius` | `none`, `small`, `medium`, `large` or `full` |
| `button_text` | The button inside cards, calendars and boxes |
| `text` | The words on a button shortcode, if you don't put them between the tags |
| `class` | CSS classes for a button shortcode. Defaults to your theme's button style |
| `prefill_email`, `prefill_name`, `prefill_phone` | Fill in the buyer's details |
| `test` | [Test mode](/developers/docs/test-mode) for subscribe buttons and pricing tables |

### Members' sites

On a membership site, add `ref="user"` to a Subscribe button or pricing table. Paylead gets the signed-in WordPress user as `wp-` plus their user ID (for example `wp-42`), with their email and name filled in. Check access with `GET /access?ref=wp-42`, or listen for [webhooks](/developers/docs/webhooks).

### Good to know

- Paylead's script only loads on pages with a Paylead shortcode. To use your own `data-paylead-*` buttons, turn on **Load on every page** in Settings → Paylead.
- A shortcode with a missing code shows a red notice to editors only. Visitors see nothing.
- Deleting the plugin removes its settings. Nothing else is stored in WordPress.

Source: https://paylead.app/developers/docs/wordpress

---

## JavaScript API and events

> Open embeds from your own code, and react when someone pays or closes the checkout.

Once `embed.js` has loaded, `window.Paylead` is available.

### Opening embeds

```js
Paylead.buy('k3x9pa', options);           // product checkout overlay
Paylead.subscribe('k3x9pa', options);     // subscribe overlay
Paylead.pay('church-giving', options);    // payment link overlay
Paylead.close();                          // close whatever is open

Paylead.product('#el', 'k3x9pa', options);              // product card
Paylead.booking('#el', 'k3x9pa', options);              // booking calendar
Paylead.course('#el', 'k3x9pa', options);               // course card
Paylead.webinar('#el', 'w8b2nd', options);              // webinar sign-up
Paylead.store('#el', 'amas-studio', options);           // product grid
Paylead.newsletter('#el', 'amas-studio', options);      // newsletter box
Paylead.tipButton('amas-studio', options);              // floating tip button
Paylead.tip('amas-studio');                             // tip page overlay
Paylead.pricing('#el', ['b4s1c0', 'pr0p1n'], options);  // pricing table
Paylead.payInline('#el', 'church-giving', options);      // pay box
```

The first argument of the inline ones is a CSS selector or an element.

#### Options

| Option | |
|---|---|
| `ref` | Your id for the user (subscriptions) |
| `prefill` | `{ email, name, phone }` |
| `theme` | `{ accent: '#0b2c2e', scheme: 'light' \| 'dark' \| 'auto', radius: 'medium' }` |
| `buttonText` | The button's words on cards, tables and pay boxes |
| `layout` | Product cards: `'card'`, `'row'` or `'minimal'` |
| `featured` | Pricing tables: the plan code to highlight |
| `amounts` | Pay boxes: `[20, 50, 100]` |
| `onPaid` | Called with the payment details when a payment finishes in the overlay |
| `onClose` | Called when the overlay closes |
| `onReady` | Called when the embed has loaded |
| `dataLayer` | Set to `false` to stop pushing events to Google Tag Manager |
| `passThrough` | Set to `false` to stop passing UTM and ad click ids from your page's address |

### Events

```js
Paylead.on('paid', (detail) => {
  // detail = { kind: 'buy' | 'subscribe' | 'pay' | 'tip', order_number, total, currency }
});

Paylead.on('close', () => {});

window.addEventListener('paylead:paid', (event) => console.log(event.detail));
```

`paid` fires when the payment finishes inside the overlay: card payments, free orders and pay-on-delivery orders. Mobile money payments finish on the mobile money page and come back to a Paylead receipt or your after-purchase link, so for anything that unlocks access, rely on [webhooks](/developers/docs/webhooks) or the [access check](/developers/docs/access-check).

### Google Tag Manager

When a payment finishes in the overlay, Paylead pushes to `window.dataLayer`:

```js
{
  event: 'paylead_purchase',
  paylead_kind: 'buy',
  paylead_order_number: 'K7Q2M9XA',
  value: 50,
  currency: 'GHS'
}
```

Forms push `paylead_form_submit`, as before.

### React

Load the script once, then call the API:

```jsx
import { useEffect } from 'react';

export function UpgradeButton({ user }) {
  useEffect(() => {
    if (window.Paylead) return;
    const script = document.createElement('script');
    script.src = 'https://paylead.app/embed.js';
    document.body.appendChild(script);
  }, []);

  return (
    <button
      onClick={() =>
        window.Paylead?.subscribe('k3x9pa', {
          ref: user.id,
          prefill: { email: user.email },
        })
      }
    >
      Upgrade to Pro
    </button>
  );
}
```

Elements with `data-paylead-*` attributes that appear after the page loads (for example after a route change) are picked up when you call `Paylead.init()`.

Source: https://paylead.app/developers/docs/javascript-api

---

## Webhooks

> Paylead calls your server when an order is paid or a subscription changes. Events, payloads, signatures and retries.

### Add an endpoint

In **Settings → Developers → Webhooks**, click **Add**, enter your endpoint's address (it must be public `https://`) and pick the events you want. Each endpoint gets its own **signing secret**, starting `whsec_`.

Click **Send test** to send a `ping` event and see the result in the event log on the same page.

### Events

| Event | When |
|---|---|
| `order.paid` | An order is paid, or a pay-on-delivery order is confirmed. Every payment, including subscription payments, embeds and payment links |
| `invoice.paid` | An invoice is paid in full |
| `subscription.trial_started` | A buyer starts a free trial. They have access; nothing is paid yet |
| `subscription.activated` | A buyer pays for a subscription for the first time, or pays after their free trial |
| `subscription.renewed` | A subscriber pays for another period |
| `subscription.past_due` | A period ended without payment. They keep access during the grace period |
| `subscription.cancelled` | A subscriber cancels. They keep access until the paid period ends |
| `subscription.expired` | Access has ended: not renewed in time, or a cancelled period ran out |

For a paid app, `subscription.activated`, `subscription.renewed` and `subscription.expired` are usually all you need: turn access on, keep it on, turn it off.

### What Paylead sends

A `POST` with a JSON body:

```json
{
  "id": "evt_9c2kq0x7m1b4z8w3r5t6y2u1",
  "type": "subscription.activated",
  "livemode": true,
  "created_at": "2026-10-10T09:00:00+00:00",
  "store": { "id": 12, "name": "My App" },
  "data": {
    "id": "sub_8f2k1m0q9z",
    "object": "subscription",
    "livemode": true,
    "status": "active",
    "has_access": true,
    "ref": "USER_123",
    "customer": { "id": 881, "name": "Ama Mensah", "email": "ama@example.com", "phone": "0240000000" },
    "product": { "id": 31, "name": "Pro plan" },
    "amount": 50,
    "currency": "GHS",
    "interval": "month",
    "current_period_end": "2026-11-10T09:00:00+00:00",
    "access_ends_at": "2026-11-13T09:00:00+00:00",
    "manage_url": "https://paylead.app/subscription/…"
  }
}
```

`data` is the same object the API returns: a [subscription](/developers/docs/api-reference#subscriptions), an [order](/developers/docs/api-reference#orders) or an [invoice](/developers/docs/api-reference#invoices).

`livemode` is `false` for [test-mode](/developers/docs/test-mode) events, which only go to endpoints you marked **Test**. Live endpoints only get real events.

With these headers:

| Header | |
|---|---|
| `X-Paylead-Event` | The event type |
| `X-Paylead-Event-Id` | The event's `id`. The same on every retry |
| `X-Paylead-Timestamp` | Unix time the request was signed |
| `X-Paylead-Signature` | `sha256=` and the signature |
| `User-Agent` | `Paylead-Webhooks/1.0` |

### Check the signature

The signature is an HMAC-SHA256 of the timestamp, a full stop and the raw request body, keyed with your endpoint's secret. Compute it yourself and compare. Use the **raw** body, before any JSON parsing.

```js
// Node.js (Express)
const crypto = require('crypto');

app.post('/webhooks/paylead', express.raw({ type: 'application/json' }), (req, res) => {
  const timestamp = req.get('X-Paylead-Timestamp');
  const expected = 'sha256=' + crypto
    .createHmac('sha256', process.env.PAYLEAD_WEBHOOK_SECRET)
    .update(`${timestamp}.${req.body}`)
    .digest('hex');

  const given = req.get('X-Paylead-Signature') || '';
  if (expected.length !== given.length ||
      !crypto.timingSafeEqual(Buffer.from(expected), Buffer.from(given))) {
    return res.status(400).end();
  }

  const event = JSON.parse(req.body);
  // handle event.type …
  res.status(200).end();
});
```

```php
// PHP / Laravel
$body = $request->getContent();
$expected = 'sha256='.hash_hmac(
    'sha256',
    $request->header('X-Paylead-Timestamp').'.'.$body,
    config('services.paylead.webhook_secret'),
);

abort_unless(hash_equals($expected, (string) $request->header('X-Paylead-Signature')), 400);

$event = json_decode($body, true);
```

```python
# Python (Flask)
import hashlib, hmac, os

body = request.get_data()
signed = request.headers['X-Paylead-Timestamp'].encode() + b'.' + body
expected = 'sha256=' + hmac.new(os.environ['PAYLEAD_WEBHOOK_SECRET'].encode(), signed, hashlib.sha256).hexdigest()

if not hmac.compare_digest(expected, request.headers.get('X-Paylead-Signature', '')):
    abort(400)
```

To guard against replays, also reject requests whose `X-Paylead-Timestamp` is more than 5 minutes old.

### Answer quickly

Reply with any `2xx` status within 15 seconds. Do slow work (sending emails, calling other services) after you reply, or in a background job.

### Retries

If your endpoint doesn't answer `2xx`, Paylead tries again after 30 seconds, 2 minutes, 10 minutes, 30 minutes, 1 hour, 2 hours and 6 hours: 8 tries over about 10 hours. You can also **Send again** any event from the log.

The same event can arrive more than once, for example if your server timed out after saving it. Use `X-Paylead-Event-Id` (or the body's `id`) to ignore events you've already handled.

Events can arrive out of order. When it matters, trust the object's current state (`status`, `current_period_end`) over the order events arrived in, or fetch it fresh from the API.

### Endpoints that keep failing

After 25 events in a row fail every retry, Paylead switches the endpoint off and shows why on the Webhooks page. Fix your endpoint, then edit it and turn it back on. Test pings don't count towards this.

### Rolling your secret

**Make new secret** on the endpoint replaces it straight away; the old one stops working. Update your server right after.

Source: https://paylead.app/developers/docs/webhooks

---

## API reference

> Every endpoint of the Paylead API, with its parameters and what it returns.

Base URL `https://paylead.app/api/v1`. Every request needs `Authorization: Bearer sk_live_…` (see [Authentication](/developers/docs/authentication)). Lists take `?page=` and `?per_page=` (up to 100).

| | Endpoint |
|---|---|
| [Access](#access) | `GET /access` |
| [Store](#store) | `GET /store` |
| [Subscriptions](#subscriptions) | `GET /subscriptions` · `GET /subscriptions/{id}` · `POST /subscriptions/{id}/cancel` |
| [Orders](#orders) | `GET /orders` · `GET /orders/{id}` |
| [Products](#products) | `GET /products` · `GET /products/{id}` |
| [Customers](#customers) | `GET /customers` · `POST /customers` · `GET /customers/{id}` · `PATCH /customers/{id}` |
| [Payment links](#payment-links) | `GET /payment-links` · `POST /payment-links` · `GET` `PATCH` `DELETE /payment-links/{id}` |
| [Invoices](#invoices) | `GET /invoices` · `POST /invoices` · `GET /invoices/{id}` · `POST /invoices/{id}/send` · `POST /invoices/{id}/cancel` |

### Access

`GET /access?ref=USER_123` answers whether a user should be let in. Pass `ref` or `email`, and optionally `product_id`. See [Checking access](/developers/docs/access-check).

### Store

`GET /store` returns the store the key belongs to.

```json
{
  "data": {
    "id": 12,
    "object": "store",
    "name": "My App",
    "description": null,
    "currency": "GHS",
    "logo_url": "https://…",
    "url": "https://…",
    "status": "active",
    "verification_status": "verified",
    "buyer_pays_charges": false,
    "created_at": "2026-09-01T10:00:00+00:00"
  }
}
```

### Subscriptions

#### The subscription object

| Field | |
|---|---|
| `id` | `sub_…` |
| `status` | `active`, `past_due`, `cancelled` or `expired` (see [statuses](/developers/docs/subscriptions#statuses)) |
| `has_access` | Whether to let them in now |
| `ref` | Your id for the user, or `null` |
| `customer` | `{ id, name, email, phone }` |
| `product` | `{ id, name }` |
| `amount`, `currency` | What they pay each period |
| `interval` | `week`, `month`, `quarter` or `year` |
| `started_at` | Their first payment |
| `current_period_start`, `current_period_end` | The paid period |
| `access_ends_at` | When access stops if they don't renew |
| `cancelled_at`, `ended_at` | When they cancelled, and when access ended |
| `payments_count`, `total_paid` | All their payments |
| `manage_url` | Their private page to renew or cancel |
| `metadata` | Extra data, `{}` if none |

#### List subscriptions

`GET /subscriptions`

| Parameter | |
|---|---|
| `status` | One status. By default every subscription that was ever paid |
| `ref` | Your id for the user |
| `email` | The subscriber's email |
| `product_id` | One product's subscriptions |

#### Get a subscription

`GET /subscriptions/sub_8f2k1m0q9z`

#### Cancel a subscription

`POST /subscriptions/sub_8f2k1m0q9z/cancel`

It won't renew, and the subscriber is told by email. They keep access until the end of the paid period; in the grace period, access ends now. Returns the subscription. Only `active` and `past_due` subscriptions can be cancelled (`422 not_cancellable` otherwise).

### Orders

#### The order object

```json
{
  "id": 4210,
  "object": "order",
  "number": "K7Q2M9XA",
  "short_number": "K7Q2M9XA",
  "payment_status": "paid",
  "order_status": "completed",
  "fulfillment_status": "fulfilled",
  "payment_method": "moolre",
  "source": "embed",
  "currency": "GHS",
  "subtotal": 50,
  "discount": 0,
  "shipping_fee": 0,
  "total": 50,
  "fee": 3,
  "net": 47,
  "customer": { "id": 881, "name": "Ama Mensah", "email": "ama@example.com", "phone": "0240000000" },
  "items": [
    { "product_id": 31, "name": "Pro plan (Monthly)", "quantity": 1, "unit_price": 50, "total": 50 }
  ],
  "payment_link_id": null,
  "invoice_id": null,
  "subscription_id": "sub_8f2k1m0q9z",
  "receipt_url": "https://paylead.app/receipt/K7Q2M9XA",
  "created_at": "2026-10-10T09:00:00+00:00",
  "updated_at": "2026-10-10T09:01:12+00:00"
}
```

`fee` is Paylead's fee on the order and `net` is what you keep. `source` is where it came from: `storefront`, `funnel`, `embed`, `payment_link`, `invoice` or `subscription`, among others.

#### List orders

`GET /orders`

| Parameter | |
|---|---|
| `payment_status` | For example `paid` or `pending` |
| `email` | The customer's email |
| `product_id` | Orders containing this product |
| `source` | Where the order came from |
| `created_after`, `created_before` | Dates or ISO 8601 times |

#### Get an order

`GET /orders/4210` or `GET /orders/K7Q2M9XA`: by id or by order number.

### Products

#### The product object

| Field | |
|---|---|
| `id`, `name`, `short_description` | |
| `kind` | `physical`, `digital`, `course`, `webinar`, `subscription`, `service`, `bookings` or `bundle` |
| `status` | `active`, `draft` and so on |
| `price`, `sale_price`, `currency` | The base price in the store's currency |
| `image_url`, `url` | The main picture and the product page |
| `subscription` | For subscriptions: `{ interval, price, subscribe_url }`. Otherwise `null` |

#### List products

`GET /products?kind=subscription&status=active`

#### Get a product

`GET /products/31`

### Customers

Customers belong to your account, shared by all your stores.

#### The customer object

`id`, `name`, `email`, `phone`, `company`, `country`, `city`, `address`, `status`, `source`, `lifetime_value`, `customer_since`, `accepts_marketing`, `created_at`, `updated_at`.

#### List customers

`GET /customers`

| Parameter | |
|---|---|
| `email` | Exact email |
| `phone` | Exact phone number |
| `search` | Part of a name, email or phone |

#### Add or update a customer

`POST /customers`

```json
{
  "name": "Kofi Boateng",
  "email": "kofi@example.com",
  "phone": "0551112222",
  "city": "Accra"
}
```

`name` is required, plus `email` or `phone`. Also takes `company`, `country`, `city` and `address`. If a customer with that email (or phone) exists, they're updated and you get `200`; otherwise they're created and you get `201`.

#### Change a customer

`PATCH /customers/881` with any of `name`, `email`, `phone`, `company`, `country`, `city`, `address`.

### Payment links

A payment link is a hosted page that takes a payment. See also [Pay and donate](/developers/docs/pay-and-donate).

#### The payment link object

`id`, `title`, `description`, `amount_type` (`fixed` or `custom`), `amount`, `min_amount`, `currency`, `status` (`active`, `paused`, `expired` or `completed`), `is_active`, `is_reusable`, `max_payments`, `expires_at`, `collect_email`, `custom_question`, `thank_you_message`, `redirect_url`, `payments_count`, `total_collected`, `url`, `created_at`, `updated_at`.

#### Create a payment link

`POST /payment-links`

```json
{
  "title": "Deposit for order #1042",
  "amount": 120,
  "is_reusable": false,
  "redirect_url": "https://mysite.com/orders/1042/paid"
}
```

| Field | |
|---|---|
| `title` | Required |
| `amount_type` | `fixed` (default) or `custom`, where the payer types the amount |
| `amount` | Required for fixed amounts |
| `min_amount` | The lowest a payer can type, for custom amounts |
| `is_reusable` | `true` (default) for many payers; `false` for one payment |
| `max_payments` | For reusable links, stop after this many |
| `expires_at` | Stop taking payments at this time |
| `collect_email` | Require an email |
| `custom_question` | One question to ask the payer |
| `thank_you_message` | Shown after paying |
| `redirect_url` | Send the payer here after paying instead |
| `description` | Shown under the title |

Returns `201` with the link. Send people to its `url`, or open it over your site with `Paylead.pay(slug)`.

#### Change, pause or delete a link

- `PATCH /payment-links/57` with any field above, or `{"is_active": false}` to pause it.
- `DELETE /payment-links/57`. Payments already made stay in your orders.

### Invoices

#### The invoice object

`id`, `number` (`INV-0042`), `status` (`draft`, `sent`, `viewed`, `part_paid`, `paid`, `overdue`, `cancelled`), `customer` `{ id, name, email, phone }`, `currency`, `items` `[{ description, quantity, unit_price }]`, `subtotal`, `discount`, `tax_label`, `tax_rate`, `tax_amount`, `total`, `amount_paid`, `balance`, `allow_part_payment`, `min_part_payment`, `notes`, `issued_on`, `due_on`, `sent_at`, `paid_at`, `cancelled_at`, `url` (the pay page), `pdf_url`, `created_at`, `updated_at`.

#### List invoices

`GET /invoices?status=overdue` or `?email=`.

#### Create an invoice

`POST /invoices`

```json
{
  "customer_name": "Kofi Boateng",
  "customer_email": "kofi@example.com",
  "customer_phone": "0551112222",
  "items": [
    { "description": "Logo design", "quantity": 1, "unit_price": 300 },
    { "description": "Business cards", "quantity": 2, "unit_price": 50 }
  ],
  "due_on": "2026-10-20",
  "send": ["email", "sms"]
}
```

| Field | |
|---|---|
| `customer_name` | Required |
| `customer_email`, `customer_phone`, `customer_id` | Who to send it to |
| `items` | Required. 1 to 50 lines of `description`, `quantity`, `unit_price` |
| `discount` | Taken off the subtotal |
| `tax_label`, `tax_rate` | For example `VAT`, `15` |
| `due_on` | The due date. Paylead reminds them on the day, 3 and 7 days after |
| `notes` | Shown on the invoice |
| `allow_part_payment`, `min_part_payment` | Let them pay in parts |
| `send` | `["email"]`, `["sms"]` or both to send it now. Without it, it's saved as a draft |

#### Send an invoice

`POST /invoices/42/send` with `{"channels": ["email", "sms"]}`. Returns `422` if the invoice is paid or cancelled, or if it couldn't go out on any channel.

#### Cancel an invoice

`POST /invoices/42/cancel`. Nobody can pay it afterwards. A paid invoice can't be cancelled.

Source: https://paylead.app/developers/docs/api-reference
